Patients › Rehabilitation
Estabilización de la articulación acromioclavicular
Rehabilitation after AC joint stabilisation or reconstruction, with the protective phase and staged return to sport.

Este protocolo describe la rehabilitación posterior a la estabilización de la articulación acromioclavicular (AC) realizada por el Dr. Kieran Hirpara en el Mater Private Hospital Rockhampton. Su objetivo es restaurar la alineación de dicha articulación, situada entre la clavícula y el omóplato, tras una dislocación; para ello se utiliza un dispositivo de suspensión, a veces reforzado con un injerto tendinoso. Lleve esta página o su versión en PDF a su primera sesión de fisioterapia para garantizar una rehabilitación coordinada. Su fisioterapeuta adaptará el proceso de rehabilitación a su caso particular, guiándolo a través de las siguientes fases según la evolución de su hombro.
Si tiene alguna duda respecto a la herida quirúrgica, no dude en ponerse en contacto con el consultorio. A menudo resulta útil tomar una fotografía de la herida y enviarla por correo electrónico para su evaluación.
Qué esperar
La estabilización de la articulación acromioclavicular difiere de la mayoría de las cirugías artroscópicas de hombro: se realiza una reparación que debe protegerse mientras cicatriza, y lo que más carga sobre ella es simplemente el peso del propio brazo. La gravedad tira constantemente del brazo (y, por ende, del omóplato) hacia abajo, alejándolo de la clavícula; esa es precisamente la dirección que la estabilización debe contrarrestar. Por ello, la rehabilitación temprana es deliberadamente protectora: el cabestrillo soporta el peso del brazo, los movimientos se mantienen dentro de límites seguros, y el fortalecimiento se pospone hasta que la reparación haya madurado.
El cabestrillo cumple una función protectora. Úselo durante 6 semanas; durante las primeras tres semanas, también debe llevarlo al dormir, pues incluso acostado el peso del brazo ejerce presión sobre la reparación. Después de tres semanas, puede quitárselo en la cama. Cuando no lleve el cabestrillo, ya sea para lavarse o para hacer ejercicios, mantenga el brazo apoyado: apoye el antebrazo en una almohada o en una mesa, en lugar de dejarlo colgando o cargando peso. Por la noche, la mayoría de las personas se sienten más cómodas acostadas boca arriba o sobre el lado no operado; si se acuesta boca arriba, coloque una almohada pequeña bajo el codo y el antebrazo para evitar que el hombro se hunda hacia atrás. Evite acostarse sobre el hombro operado mientras la reparación cicatriza.
No debe conducir durante seis semanas después de cualquier cirugía de hombro, ni mientras lleve el cabestrillo.
Su programa de ejercicios incluye tres tipos de movimientos; su equipo médico le indicará cuáles son aplicables en su caso:
- Rango de movimiento activo: se permiten los movimientos sin ayuda externa.
- Rango de movimiento activo asistido: se utiliza el otro brazo o algún objeto para ayudar a mover el brazo.
- Rango de movimiento pasivo: el brazo permanece completamente relajado; el otro brazo o una fuerza externa realiza el 100 % del movimiento.
Resumen del proceso:
- Fase I: Protección de la reparación, semanas 0–6
- Fase II: Recuperación del movimiento, semanas 6–12
- Fase III: Fortalecimiento, semanas 12–18
- Fase IV: Regreso a deportes y actividades pesadas, a partir de la semana 18
Estos intervalos semanales son orientativos, no fijos; los protocolos publicados para esta cirugía varían, y su fisioterapeuta ajustará el progreso según el estado de la reparación y su capacidad de movimiento, no según el calendario. La mayoría de las personas pueden utilizar el brazo para actividades cotidianas normales alrededor de los tres meses. El regreso a deportes de contacto o con colisiones suele tardar entre cuatro y seis meses; en algunos deportes y profesiones, el proceso de recuperación es aún más prolongado.
Fase I — Protección de la reparación (Semanas 0–6)
Kieran Hirpara 4.0
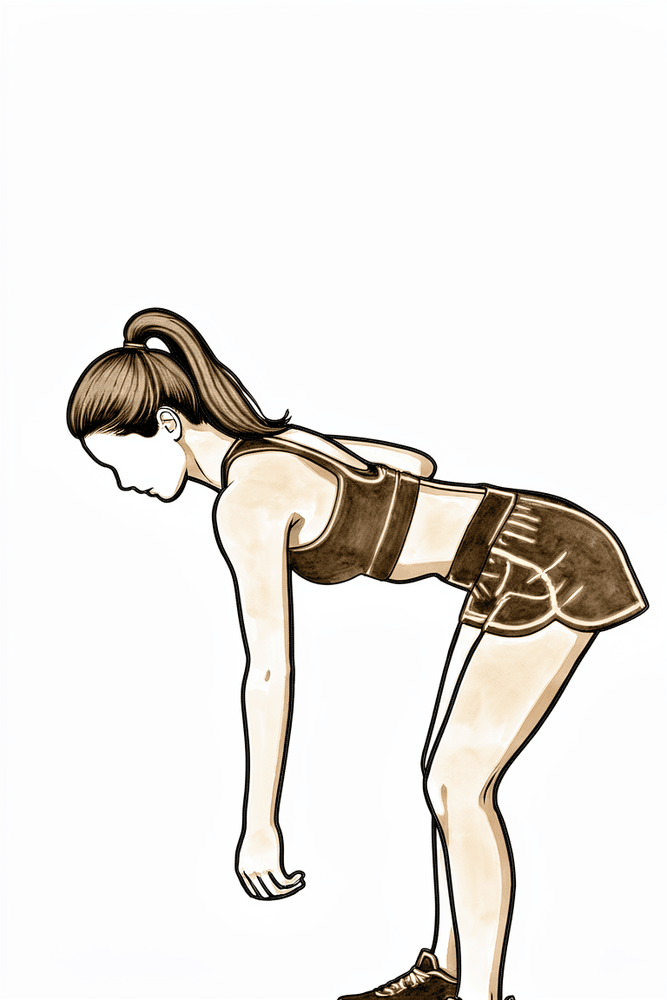
Ejercicio del péndulo
Retire el cabestrillo, inclínese hacia adelante por la cintura y deje que el brazo operado cuelgue suavemente lejos del cuerpo. Haga que el brazo describa círculos pequeños y relajados; el movimiento debe provenir del cuerpo, no de los músculos del hombro. Manténgase dentro de los límites del confort, y luego vuelva a apoyar el brazo en el cabestrillo.
Varias veces al día
Kieran Hirpara 4.0
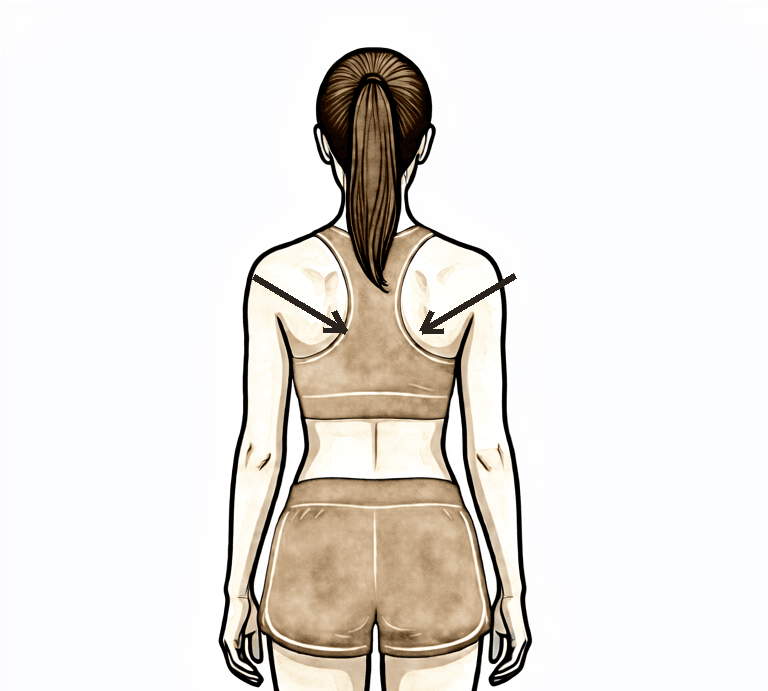
Posicionamiento escapular
Ya sea sentado o de pie con el brazo apoyado, acerque suavemente los omóplatos el uno hacia el otro y hacia abajo, alejándolos de las orejas. Mantenga la posición unos segundos y luego relájese. De este modo, los músculos posturales se mantienen activos sin ejercer carga sobre la zona en proceso de reparación.
Según las indicaciones de su fisioterapeuta.
Kieran Hirpara 4.0
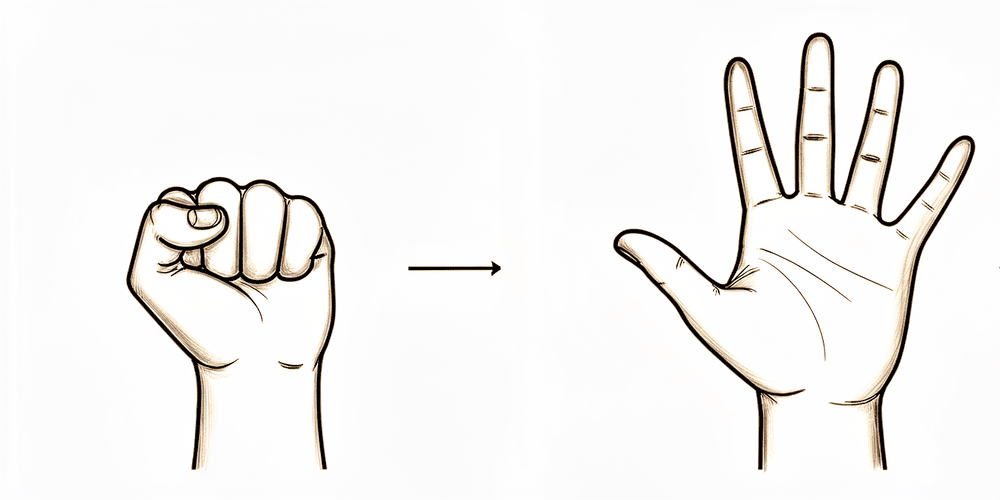
Ejercicios para la mano y la prensión
Con el brazo apoyado en el cabestrillo, haga un puño completo y luego estire los dedos. Para ejercicios de agarre, puede apretar una pelota blanda o un calcetín enrollado. Es importante mantener en movimiento la mano, la muñeca y el codo desde el primer día.
Según las indicaciones de su fisioterapeuta.
Kieran Hirpara 4.0
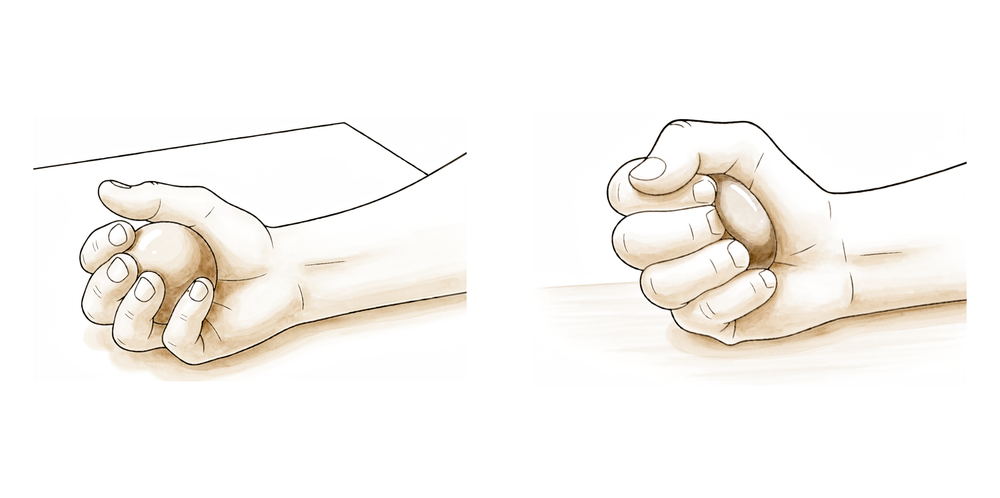
Apriete de pelota
Con el brazo apoyado en el cabestrillo, tome una pelota blanda o un calcetín enrollado y apriételo con fuerza; luego suéltelo. De este modo se mantienen activos la fuerza de agarre y el antebrazo, mientras se protege el hombro.
Según las indicaciones de su fisioterapeuta.
Kieran Hirpara 4.0
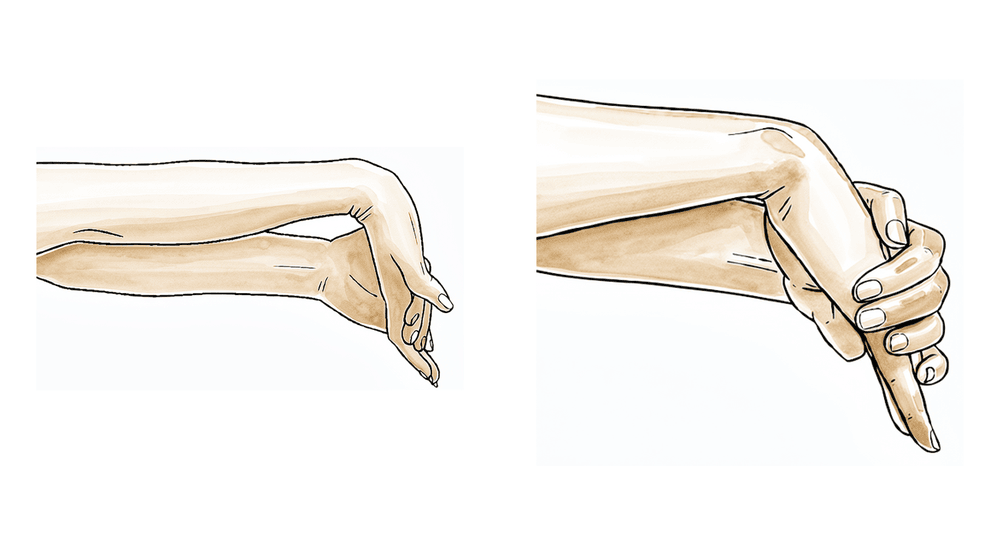
Movimiento de la muñeca
Con el brazo fuera del cabestrillo y el antebrazo apoyado, doble la muñeca hacia adelante, hacia atrás y de lado a lado. Mantener el movimiento de la muñeca desde el primer día evita que se vuelva rígida mientras la zona operada permanece protegida.
Según las indicaciones de su fisioterapeuta.
Kieran Hirpara 4.0
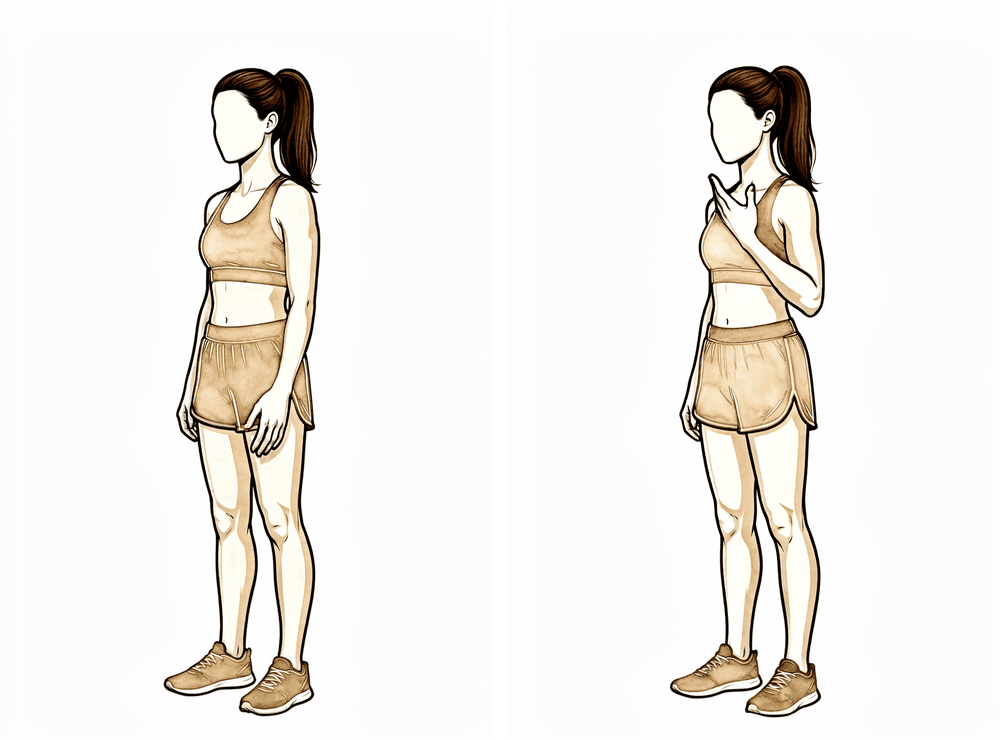
Flexión del codo
Con el brazo apoyado a lo largo del costado, doble el codo tanto como le resulte cómodo y luego estírelo por completo. Solo debe moverse el codo; mantenga el hombro relajado y apoyado para que la zona reparada no sufra carga alguna.
Según las indicaciones de su fisioterapeuta.
Kieran Hirpara 4.0
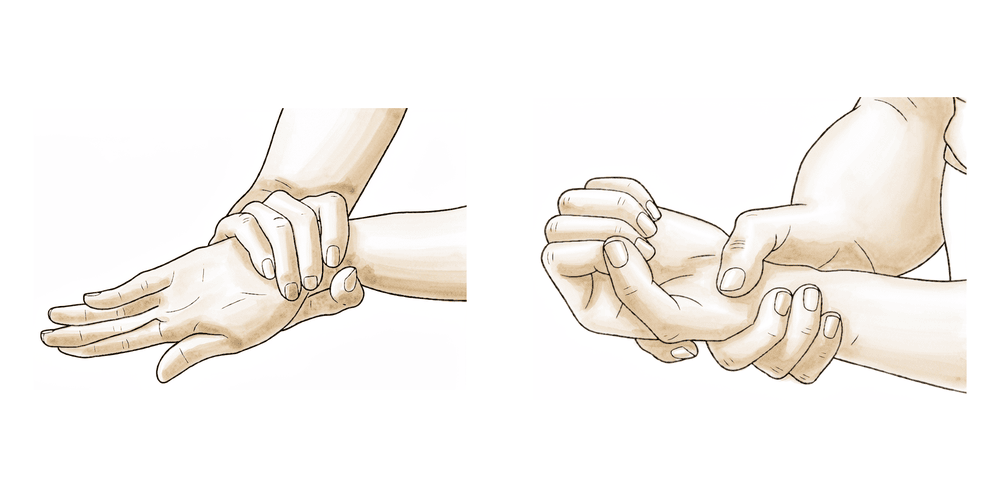
Rotación del antebrazo
Con el codo pegado al costado y doblado en ángulo recto, gire la palma de la mano hacia el techo y luego hacia el suelo. El antebrazo rota mientras el hombro permanece inmóvil y bien apoyado.
Según las indicaciones de su fisioterapeuta.
Kieran Hirpara 4.0
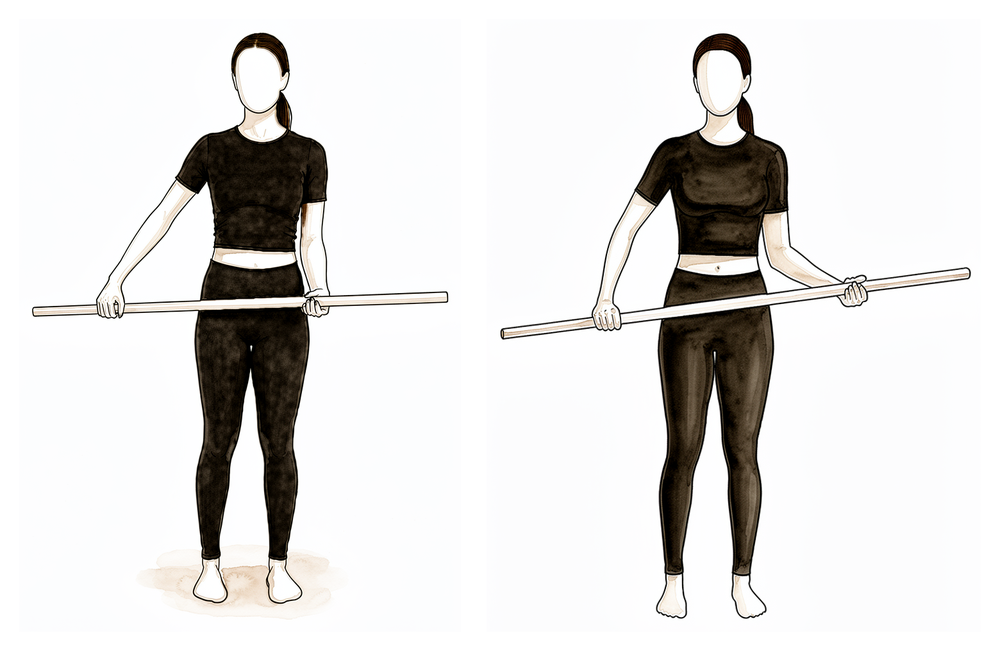
Rotación externa asistida mediante un palo
Acuéstese boca arriba con el codo operado pegado al costado y doblado en ángulo recto. Sostenga un palo con ambas manos y permita que el brazo sano gire suavemente el antebrazo operado hacia afuera, solo hasta donde le resulte cómodo en esta fase. Regrese lentamente a la posición inicial, manteniendo el movimiento pequeño y con apoyo.
Según las indicaciones de su fisioterapeuta.
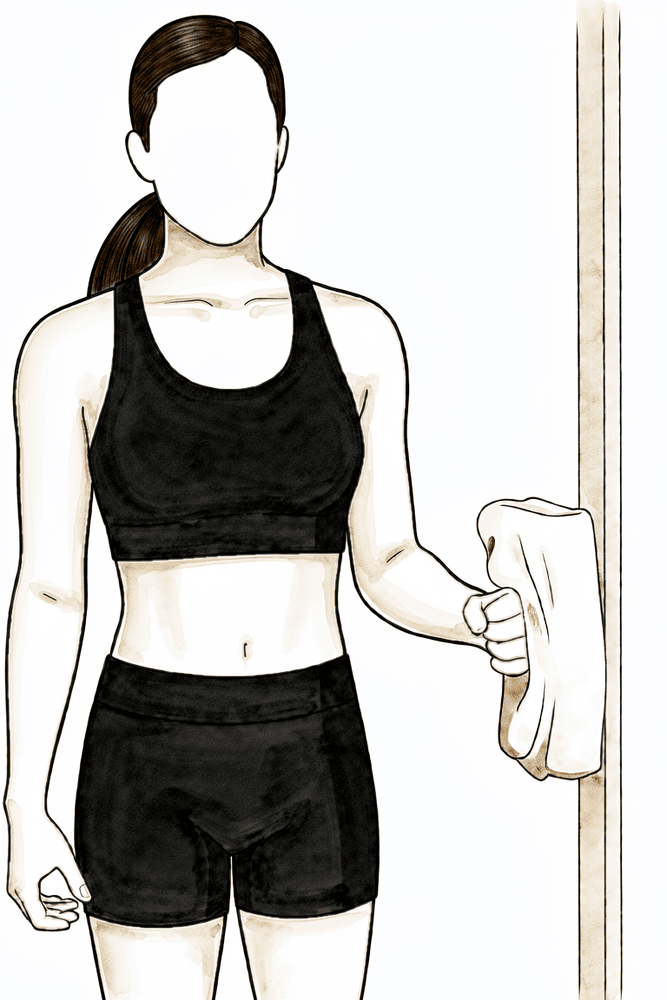
Kieran Hirpara 4.0
Rotación externa isométrica
Párese con el codo pegado al costado y doblado en ángulo recto, con el dorso de la mano apoyado contra una pared o marco de puerta. Presione suavemente hacia afuera sin mover el brazo, mantenga la posición unos segundos y luego relájese. El hombro trabaja, pero no se mueve; de este modo, la reparación no soporta carga alguna.
Submáximo y sin dolor; según las indicaciones de su fisioterapeuta.
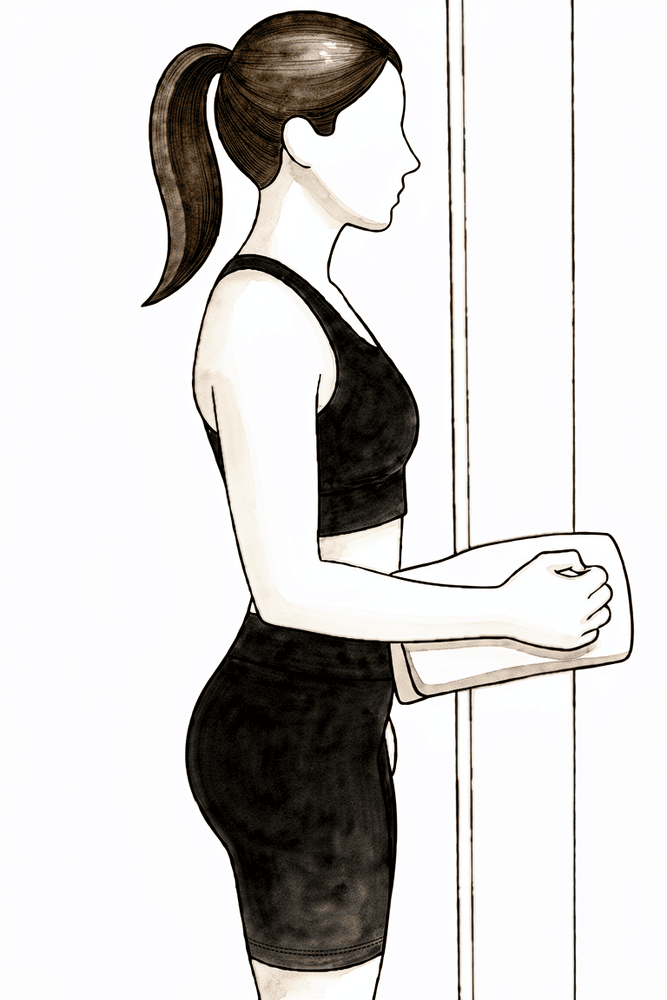
Kieran Hirpara 4.0
Rotación interna isométrica
Párese con el codo pegado al costado y doblado en ángulo recto; la palma de la mano debe quedar contra una pared o marco de puerta. Presione suavemente hacia adentro sin mover el brazo, mantenga la posición unos segundos y luego relájese. Es una forma de no mover el brazo para mantener activo el manguito rotador en las primeras fases del tratamiento.
Submáximo y sin dolor; según las indicaciones de su fisioterapeuta.
Las primeras seis semanas tienen como objetivo permitir la cicatrización de la reparación mientras se mantiene el movimiento del resto del brazo. El cabestrillo soporta el peso del brazo cuando usted está de pie o en movimiento. Desde el primer día, su mano, muñeca y codo deben seguir moviéndose: utilice la mano para tareas ligeras como escribir y comer mientras el brazo permanece en el cabestrillo. En cuanto al hombro, se inician ejercicios pendulares suaves y movimientos asistidos dentro de límites estrictos: nada por encima de la altura del hombro, sin estirar el brazo a través del cuerpo ni hacia atrás. El hielo y los analgésicos regulares facilitan la realización de estos ejercicios. Tome los analgésicos antes de hacer ejercicios o sesiones de fisioterapia. Puede ducharse una vez que las indicaciones de cuidado de la herida lo permitan; para lavar bajo el brazo operado, incline el torso hacia adelante y deje que el brazo se aleje suavemente del cuerpo, en la misma posición que en los ejercicios pendulares.
Durante esta fase, no levante nada que pese más de medio kilogramo con el brazo operado, no lleve bolsas en ese lado, no se apoye en el brazo ni lo use para levantarse de la cama o una silla, y no deje que el brazo cuelgue sin soporte: todas estas acciones tiran del omóplato hacia abajo, alejándolo de la clavícula y sobrecargando la reparación.
Para su fisioterapeuta:
Objetivos
- Proteger la estabilización quirúrgica y favorecer la cicatrización de los tejidos blandos
- Controlar el dolor y la hinchazón; proteger la cicatrización de la herida
- Prevenir la rigidez del hombro dentro de los rangos permitidos
- Mantener la amplitud de movimiento de la mano, muñeca, codo y cuello
Manejo
- Usar el cabestrillo durante 6 semanas siempre que esté de pie o en movimiento; apoyar el brazo cuando no lo lleve
- Ejercicios pendulares varias veces al día
- Elevación pasiva y asistida en el plano de la escápula, limitada a 90 grados
- Rotación externa pasiva y asistida según la tolerancia del paciente (inicialmente hasta unos 30 grados)
- Movilización activa de la mano, muñeca, codo y antebrazo; apretar una pelota
- Retracción y depresión de la escápula, así como corrección postural
- Rotaciones isométricas internas y externas, por debajo del umbral de dolor, en posición neutra
- Movilización de tejidos blandos y de la articulación escapulotorácica según sea necesario; masaje de la cicatriz una vez curada
- Aplicar hielo durante 15–20 minutos varias veces al día, según sea preciso; administrar analgésicos antes de ejercicios y sesiones
Precauciones
- Evitar que el peso del brazo tire de la fijación: no dejar que cuelgue, no cargar peso ni ejercer tracción hacia abajo
- No elevar el brazo por encima de 90 grados en ningún plano
- No realizar movimientos activos del hombro fuera del programa asistido prescrito
- No realizar aducción horizontal a través del cuerpo ni rotación interna detrás de la espalda
- No levantar nada que pese más de medio kilogramo; no apoyar el peso corporal en el brazo
- No conducir durante seis semanas (esto aplica a cualquier cirugía de hombro), ni mientras lleve el cabestrillo
Criterios para avanzar a la siguiente fase
- Alrededor de 90 grados de flexión pasiva en el plano de la escápula
- Alrededor de 30 grados de rotación externa pasiva en el plano de la escápula
- Tolerancia al programa de movilidad y ejercicios isométricos, con disminución del dolor y la hinchazón
Fase II — Recuperación del movimiento (Semanas 6–12)
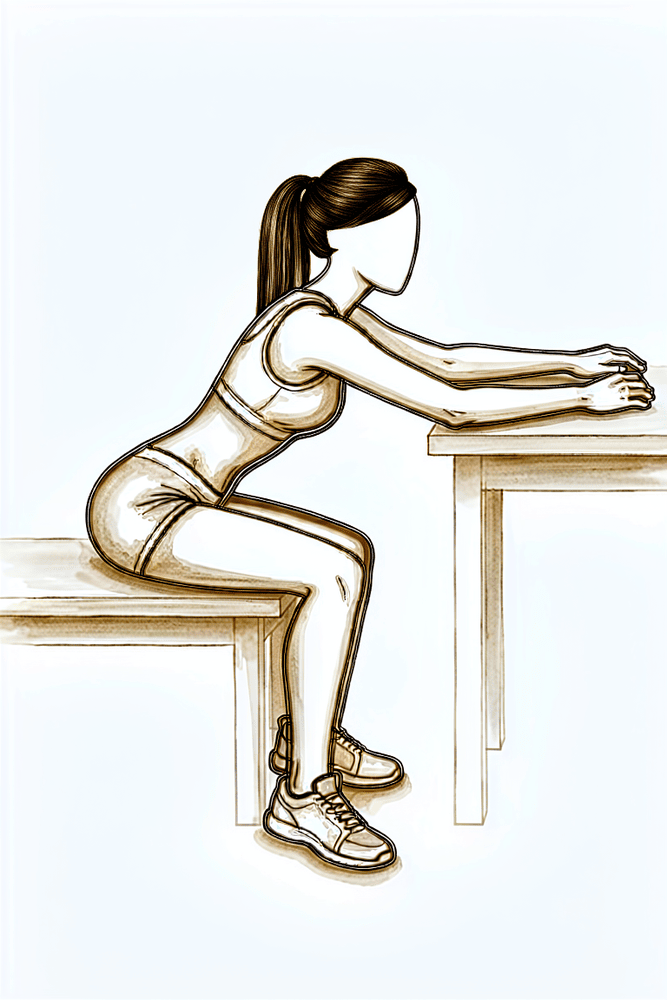
Kieran Hirpara 4.0
Deslizamiento sobre la encimera
Siéntese en una mesa o banco con las manos apoyadas sobre la superficie. Deslice las manos hacia adelante, permitiendo que el tronco se incline para que el hombro se flexione hacia arriba con apoyo, y luego regrese a la posición inicial. Realice el movimiento de forma suave y dentro de sus límites de comodidad, sin llevar el hombro bruscamente hacia la oreja.
Según las indicaciones de su fisioterapeuta.
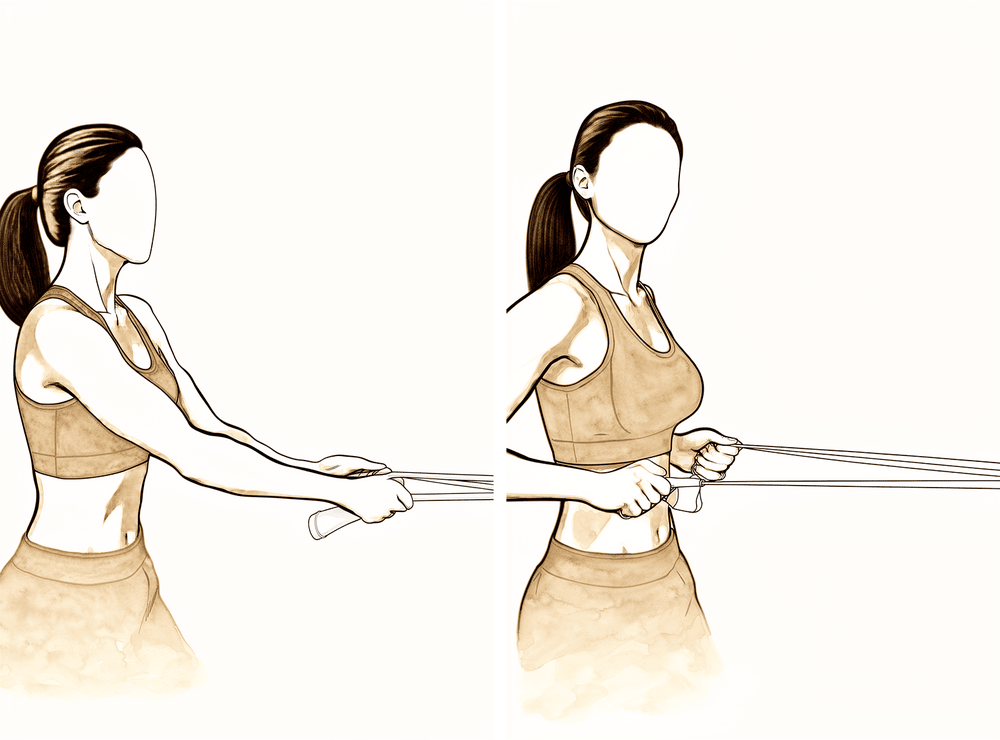
Kieran Hirpara 4.0
Remo con banda elástica
Fije una banda elástica de ejercicios delante de usted, a una altura aproximada de la cintura. Tire de la banda hacia usted, llevando el omóplato hacia atrás y hacia abajo mientras el codo pasa por el costado; luego regrese a la posición inicial de forma controlada. En esta fase, mantenga la resistencia baja.
Según las indicaciones de su fisioterapeuta.
Kieran Hirpara 4.0
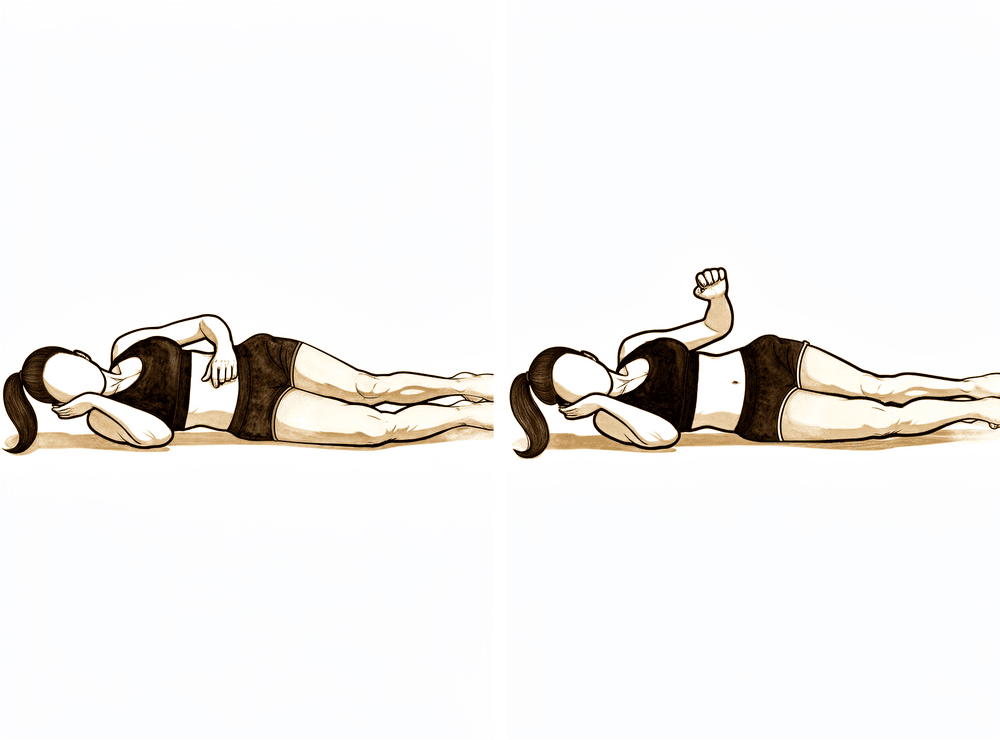
Rotación externa en decúbito lateral
Acuéstese sobre el lado no operado, con el codo superior doblado en ángulo recto y pegado al cuerpo. Manteniendo el codo junto al cuerpo, gire el antebrazo hacia arriba, en dirección al techo, y luego bájelo de forma controlada. En esta fase no se debe aplicar peso; el peso se añadirá más adelante, según las indicaciones.
Según las indicaciones de su fisioterapeuta.
Kieran Hirpara 4.0
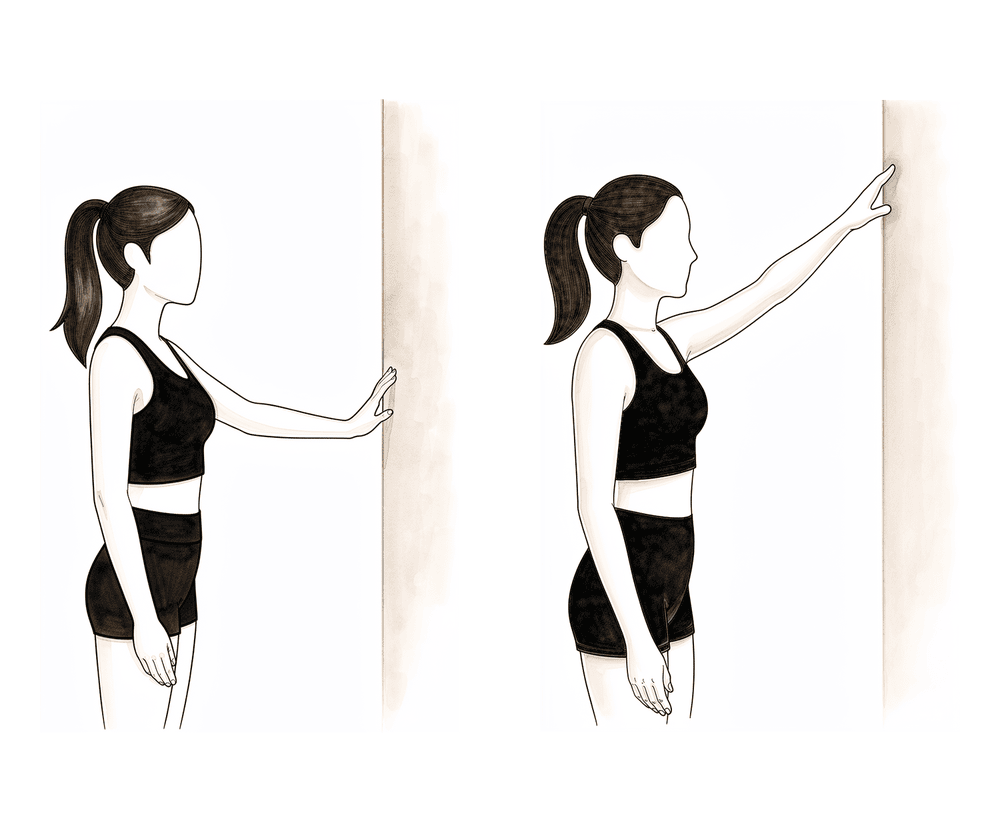
Caminar con los dedos contra la pared
Párese de cara a una pared y apoye los dedos de la mano operada en ella. Desplace los dedos lentamente hacia arriba por la pared, permitiendo que soporten parte del peso del brazo a medida que el hombro se eleva; luego desplácelos de nuevo hacia abajo. Mantenga el omóplato relajado: no debe moverse hacia la oreja.
Según las indicaciones de su fisioterapeuta.
Kieran Hirpara 4.0
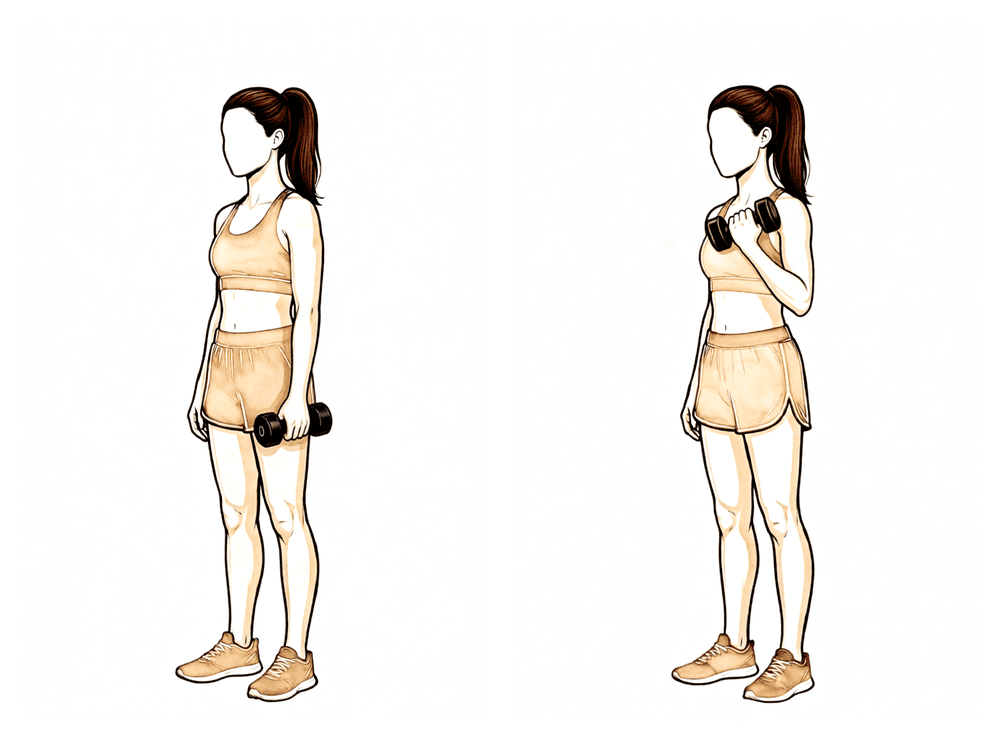
Flexión de bíceps
Con el brazo a un lado del cuerpo, doble el codo para levantar un peso ligero hacia el hombro y luego bájelo lentamente. En esta fase, utilice pesos ligeros; esto fortalece el brazo sin sobrecargar la zona en proceso de recuperación.
Según las indicaciones de su fisioterapeuta.
Kieran Hirpara 4.0
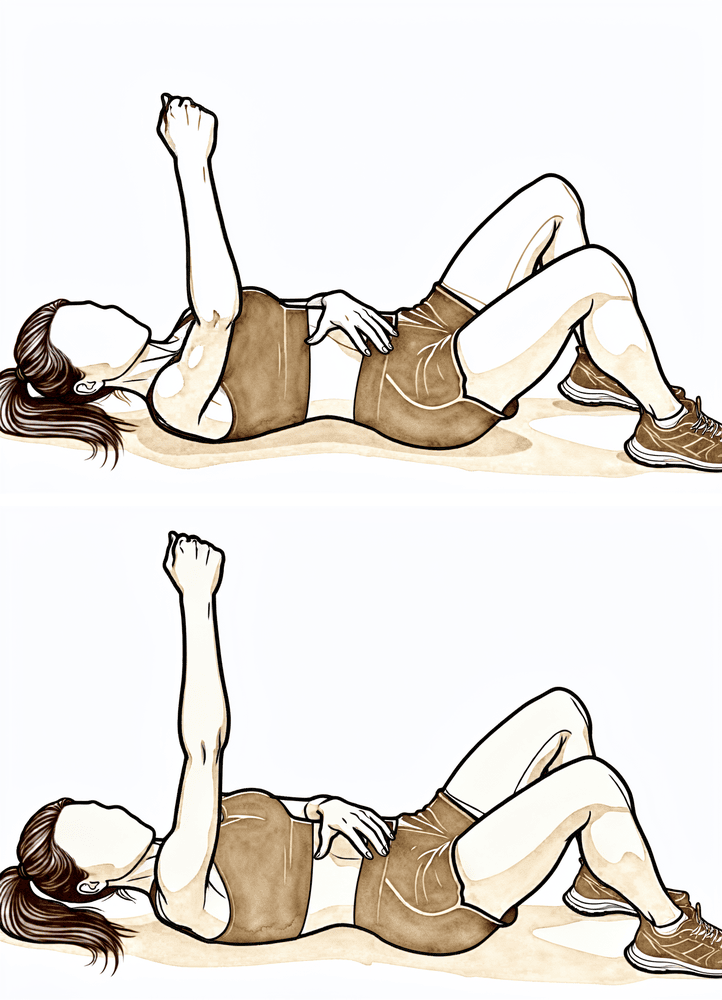
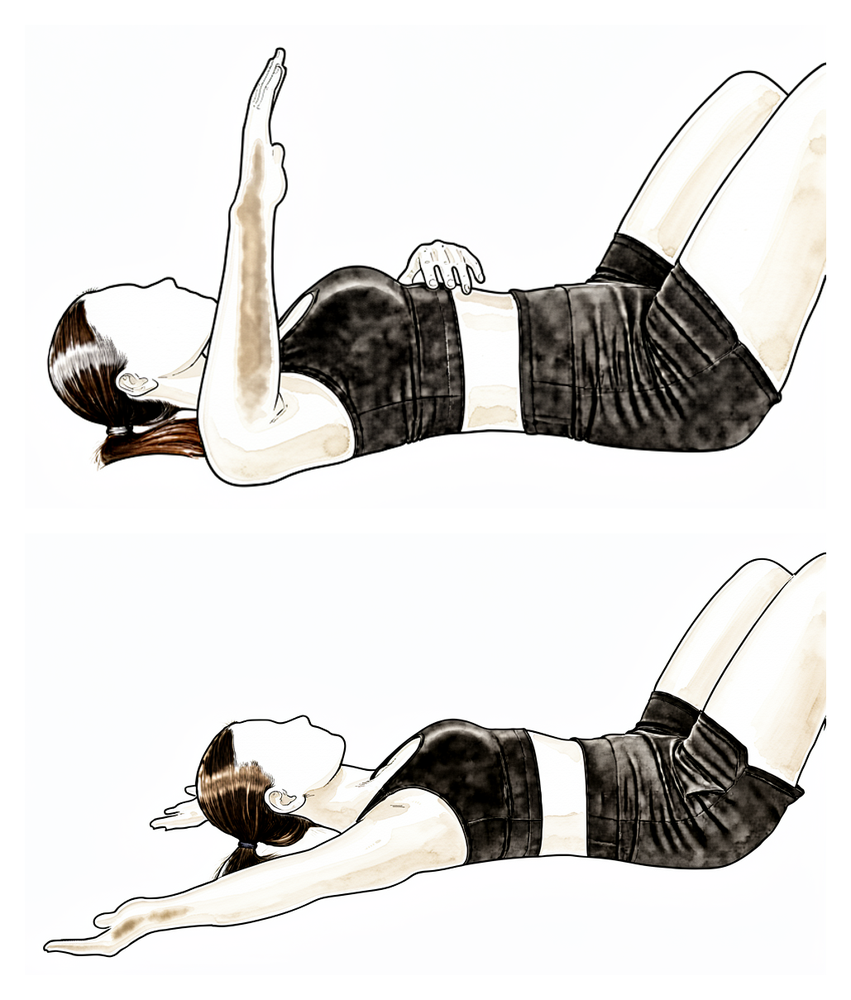
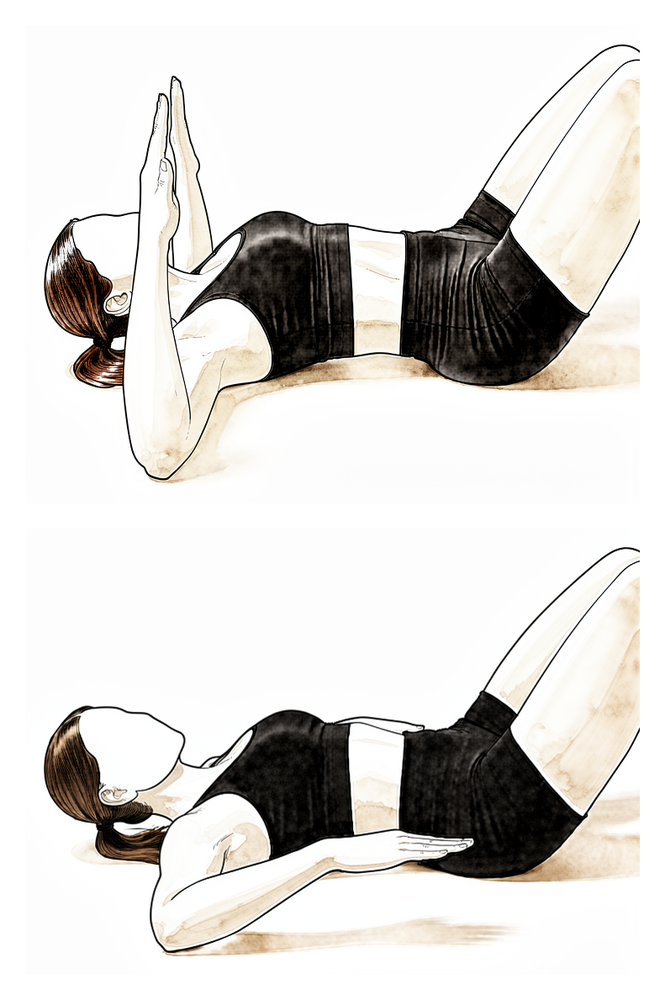
Empuje del serrato
Acuéstese boca arriba con el brazo operado apuntando hacia el techo. Sin doblar el codo, estire el puño un poco más hacia arriba hasta que el omóplato se levante de la cama; luego bájelo de forma controlada. Esto activa el músculo que mantiene el omóplato unido a las costillas.
Según las indicaciones de su fisioterapeuta.
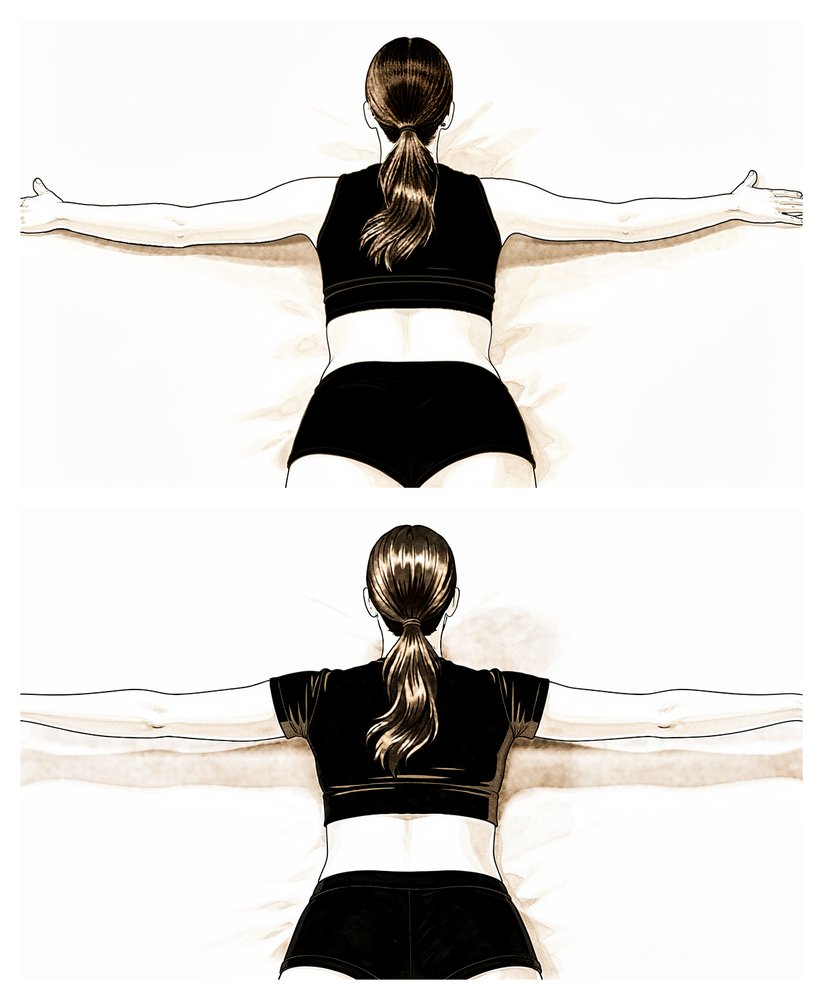
Kieran Hirpara 4.0
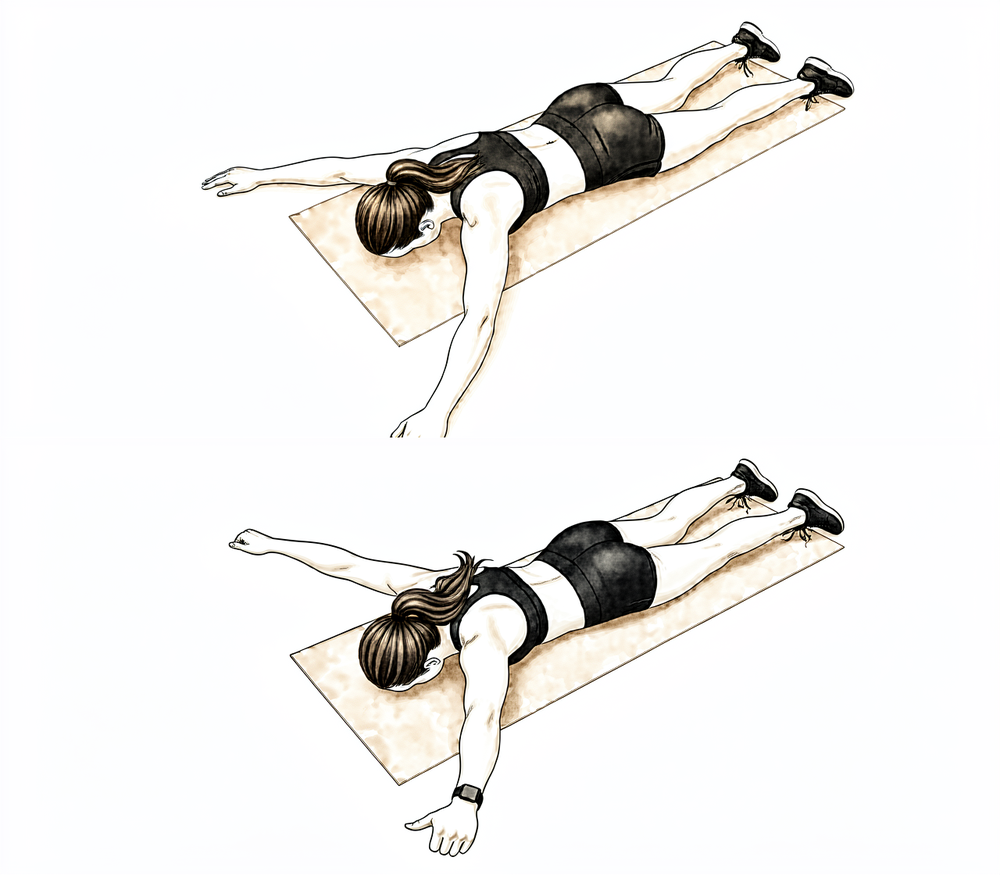
Posición prona T
Acuéstese boca abajo con los brazos colgando hacia el suelo. Apriete los omóplatos uno contra el otro y eleve el brazo operado hacia el costado formando una “T”; luego bájelo lentamente. Haga el movimiento con suavidad: así se ejercitan los músculos de los omóplatos sin sobrecargar la articulación.
Según las indicaciones de su fisioterapeuta.
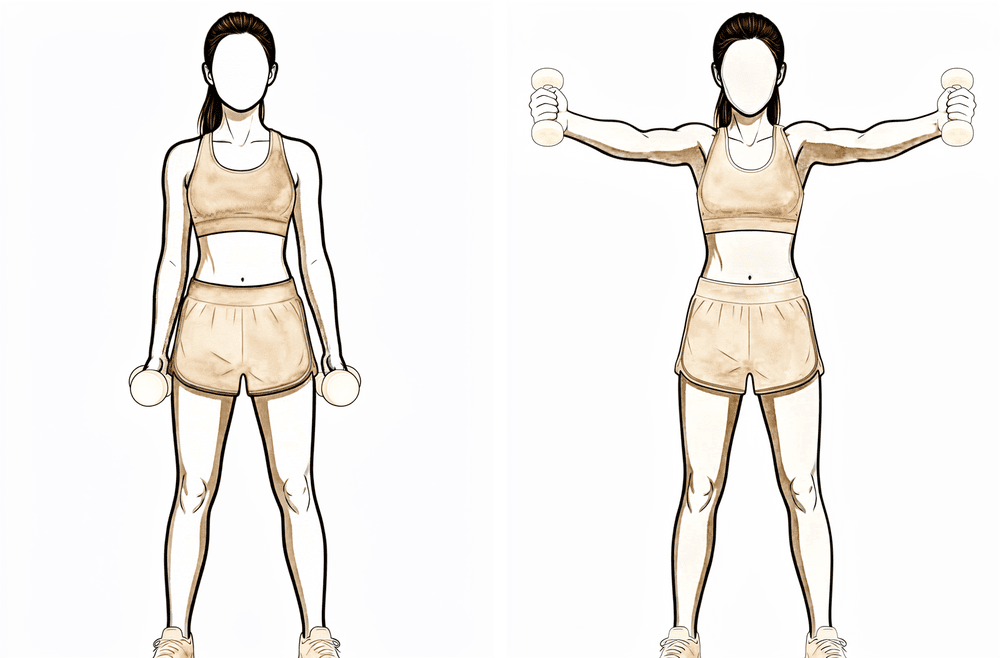
Kieran Hirpara 4.0
Elevación en el plano escapular de pie
Párese con el brazo a lo largo del cuerpo, con el pulgar apuntando hacia arriba. Eleve el brazo formando un ángulo hacia adelante, a mitad de camino entre la posición recta hacia adelante y la posición lateral; no lo eleve más de lo que le resulte cómodo, y luego bájelo lentamente. Mantenga el omóplato estable y evite encoger los hombros.
Según las indicaciones de su fisioterapeuta.
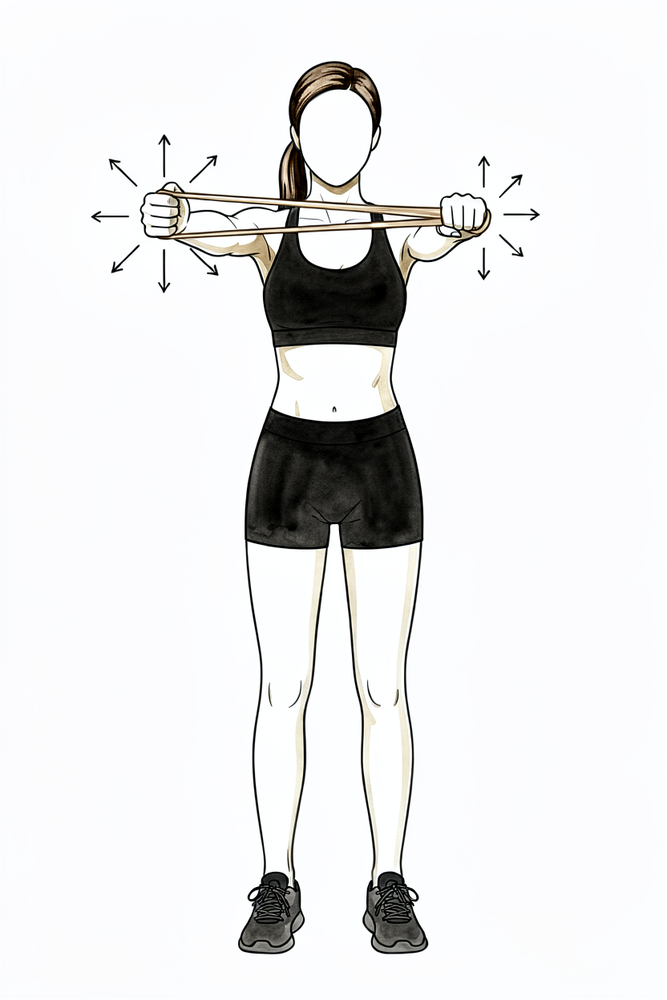
Kieran Hirpara 4.0
Estabilización rítmica
Con el brazo apoyado delante de usted a una altura aproximada de los hombros, pida a su fisioterapeuta (o a su mano sana) que realice pequeños empujes suaves desde distintas direcciones, mientras usted mantiene el brazo inmóvil y estable; no permita que se mueva. Esto entrena a los músculos estabilizadores del hombro para que reaccionen. Asegúrese de que todos los movimientos sean suaves.
Según las indicaciones de su fisioterapeuta.
A partir de las seis semanas aproximadamente, se va retirando el cabestrillo y se van eliminando progresivamente las restricciones de movimiento. Los movimientos asistidos pasan a ser movimientos activos, y el rango de movimiento aumenta de forma constante; como referencia, los protocolos publicados proponen incrementar el rango de movimiento en aproximadamente 15 grados cada semana, con el objetivo de alcanzar un movimiento completo alrededor de la semana 12. En esta fase se inician ejercicios suaves con bandas elásticas para el manguito rotador y los músculos del omóplato. No obstante, hay que seguir respetando la zona operada: mantenga el peso levantado en torno a un kilogramo, y evite empujar o tirar con fuerza, hacer flexiones, así como levantar objetos por encima de la cabeza o cruzando el cuerpo. El movimiento de alcanzar detrás de la espalda suele ser el último en recuperarse.
Para su fisioterapeuta:
Objetivos
- Retirar progresivamente el cabestrillo
- Restaurar el rango de movimiento activo en todos los planos (hasta alcanzar uno completo o casi completo alrededor de la semana 12)
- Iniciar un fortalecimiento suave; minimizar la atrofia muscular
- Restablecer el ritmo escapulohumeral y el control neuromuscular
Manejo
- Pasar de movimientos activo-asistidos a movimientos activos de elevación; incluir deslizamientos contra la pared o la encimera para la flexión
- Realizar elevaciones en el plano escapular prestando atención a la mecánica del omóplato: evitar cualquier interrupción brusca en el movimiento
- Introducir gradualmente la rotación interna detrás de la espalda (inicialmente hasta la altura del cinturón)
- La aducción horizontal solo debe realizarse como movimiento activo; no aplicar estiramiento pasivo aún
- Ejercicios con banda elástica: rotación interna y externa, flexión de bíceps, remo y ejercicios para el serrato anterior
- Ejercicios dinámicos para el omóplato y el manguito rotador: rotación externa en decúbito lateral, remo en decúbito prono, extensión en decúbito prono, ejercicios en forma de “T” y “Y” en decúbito prono, y elevación lateral de brazo de pie
- Ejercicios de propiocepción y estabilización rítmica
- Terapia manual y movilización articular según sea necesario
Precauciones
- No levantar objetos más pesados de un kilogramo con el brazo operado
- No empujar ni tirar con fuerza; no hacer flexiones
- No levantar objetos pesados por encima de la cabeza ni cruzando el cuerpo
- Evitar estiramientos en el extremo del rango de movimiento que impliquen aducción cruzada del cuerpo; el movimiento detrás de la espalda debe progresar de forma gradual
Criterios para avanzar
- Al menos 140 grados de flexión pasiva y 60 grados de rotación externa pasiva en el plano escapular
- Flexión activa contra la gravedad de al menos 100 grados, manteniendo una mecánica correcta
- Tolerancia al rango de movimiento activo y al programa inicial de fortalecimiento
Fase III — Fortalecimiento (Semanas 12–18)
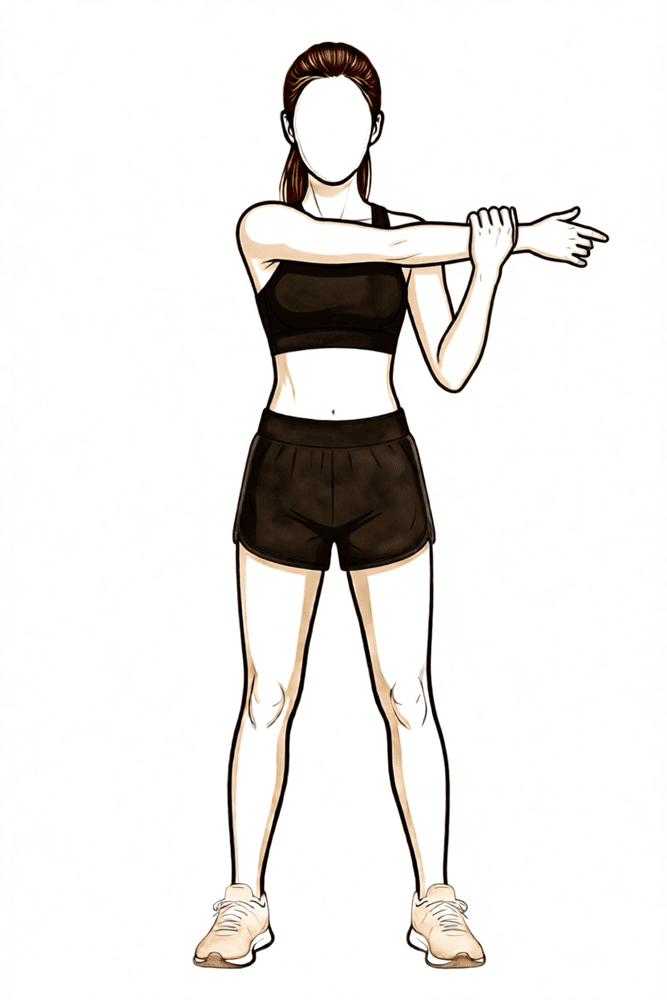
Kieran Hirpara 4.0
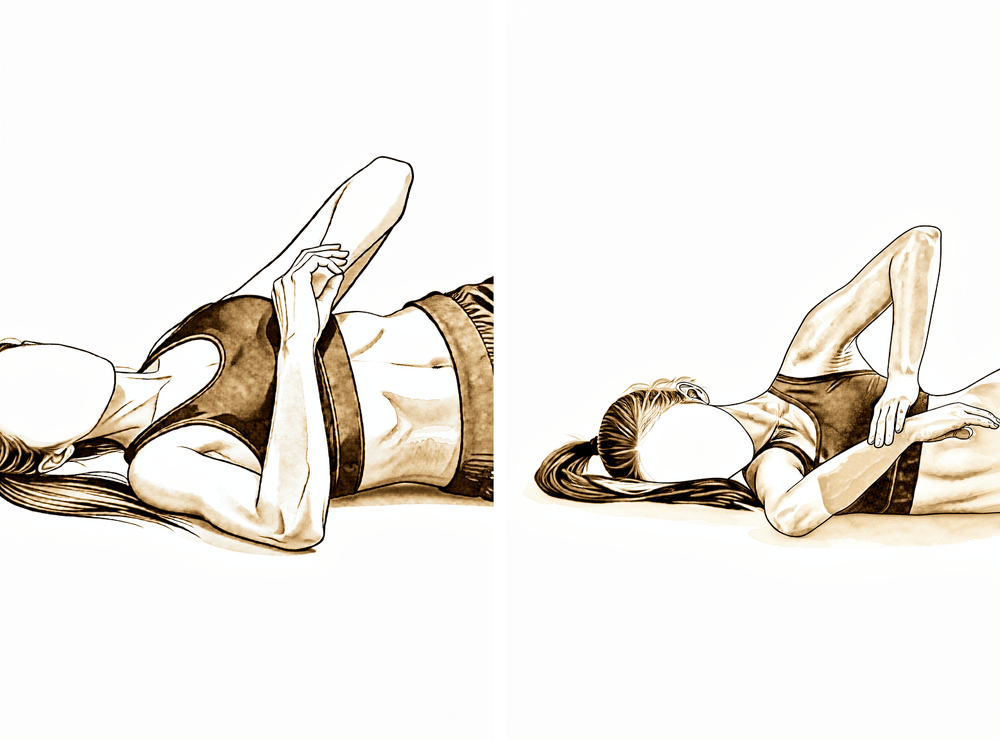
Estiramiento cruzado del cuerpo
Cruce el brazo operado sobre el pecho y use la otra mano, colocada por encima del codo, para desplazarlo suavemente más hacia el otro lado hasta que sienta un estiramiento en la parte posterior del hombro. Mantenga esa posición y luego relájese. Este estiramiento antes estaba contraindicado, pero ahora se emplea para lograr los últimos grados de amplitud de movimiento.
Según las indicaciones de su fisioterapeuta.
Kieran Hirpara 4.0
Estiramiento de “dormilón”
Acuéstese sobre el lado operado, con el hombro y el codo doblados en ángulo recto. Utilice la otra mano para bajar suavemente el antebrazo hacia la cama hasta sentir un estiramiento en la parte posterior del hombro. Mantenga esa posición y luego relájese; debe ser un estiramiento, no dolor.
Según las indicaciones de su fisioterapeuta.
Kieran Hirpara 4.0
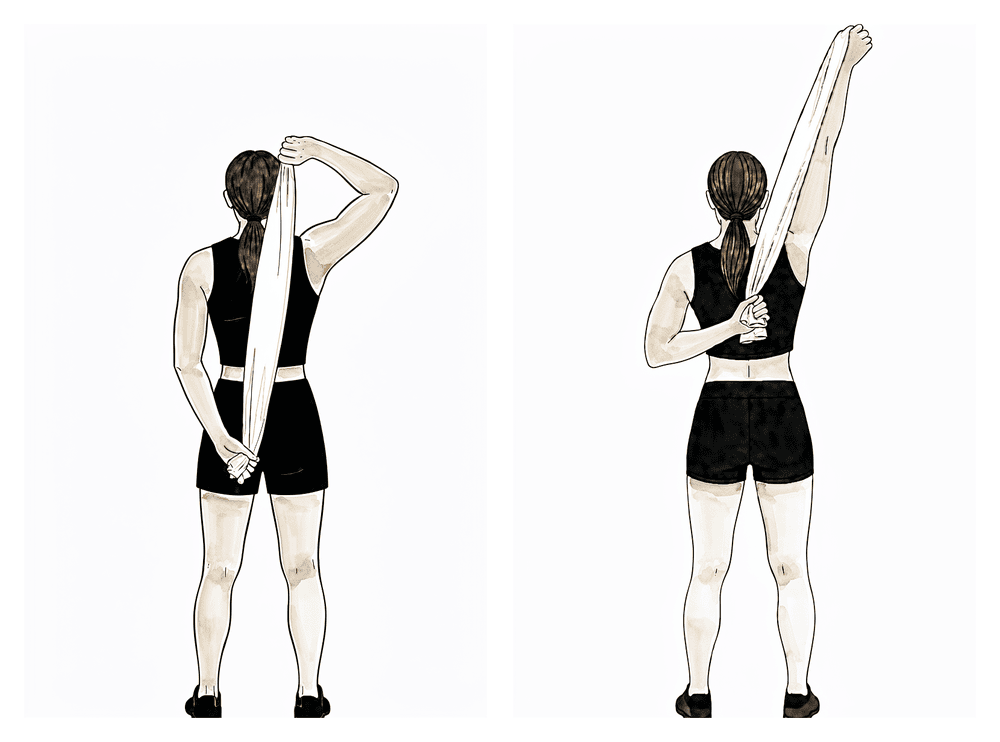
Estiramiento detrás de la espalda con una toalla
Sostenga una toalla detrás de la espalda: la mano sana debe ir sobre el hombro y la mano operada, en la zona lumbar. Con la mano sana, tire suavemente de la toalla hacia arriba para elevar la mano operada por la espalda hasta que sienta un estiramiento; luego suelte. Los movimientos detrás de la espalda son de los últimos en recuperarse, por lo que debe practicarlos con cuidado.
Según las indicaciones de su fisioterapeuta.

Kieran Hirpara 4.0
Manos detrás de la cabeza
Entrelace ambas manos detrás de la cabeza y lleve suavemente los codos hacia afuera y hacia atrás hasta sentir un estiramiento en la parte frontal del hombro. Mantenga la posición y luego relájese. Este ejercicio recupera el último rango de rotación externa del brazo cuando está elevado.
Según las indicaciones de su fisioterapeuta.
Kieran Hirpara 4.0
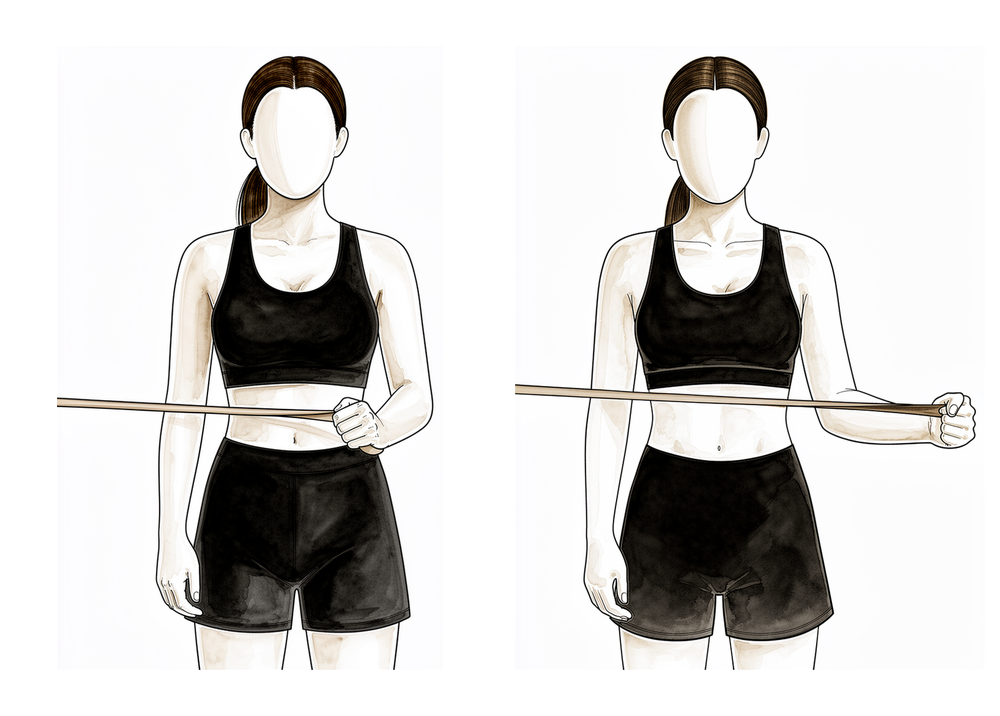
Rotación externa a 90 grados
Levante el brazo hasta la altura del hombro con el codo doblado en ángulo recto, sosteniendo una banda elástica. Gire el antebrazo hacia arriba contra la resistencia de la banda, de modo que el dorso de la mano se eleve, y luego regrese lentamente a la posición inicial. Este es un ejercicio de mayor dificultad para el manguito rotador, que se realiza una vez que se haya logrado buena movilidad y control.
Según las indicaciones de su fisioterapeuta.
Kieran Hirpara 4.0
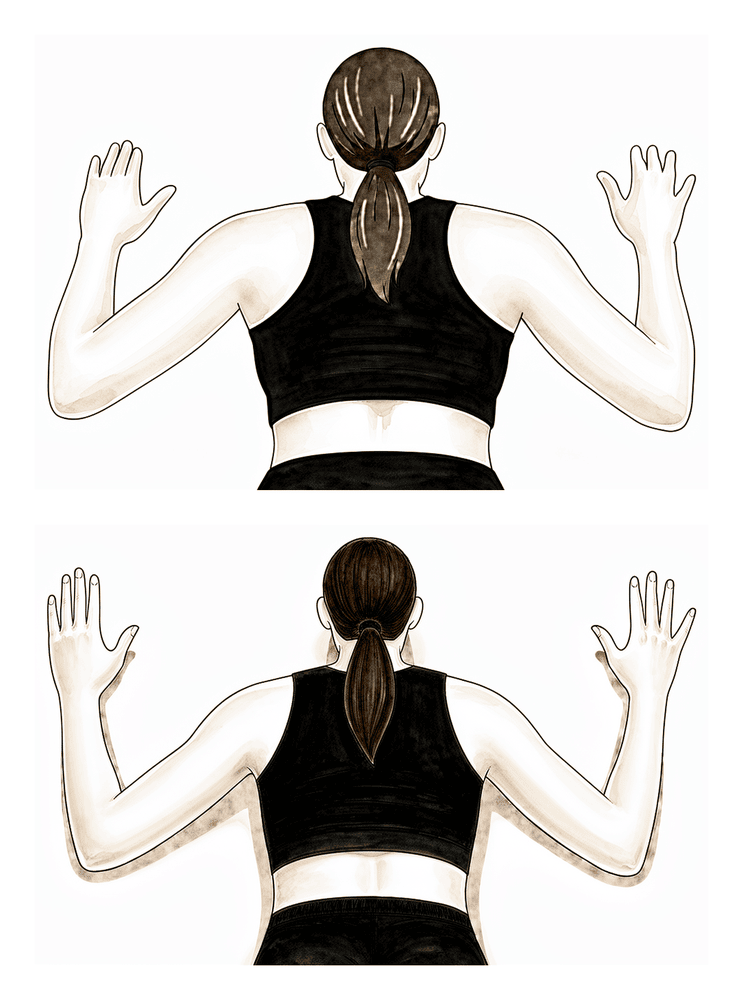
Posición prona W
Acuéstese boca abajo con los brazos colgando. Apriete los omóplatos uno contra el otro y lleve los codos hacia atrás y hacia abajo de modo que los brazos formen una ‘W’; luego baje los brazos lentamente. Este ejercicio fortalece los músculos de la parte inferior de los omóplatos que estabilizan la articulación.
Según las indicaciones de su fisioterapeuta.
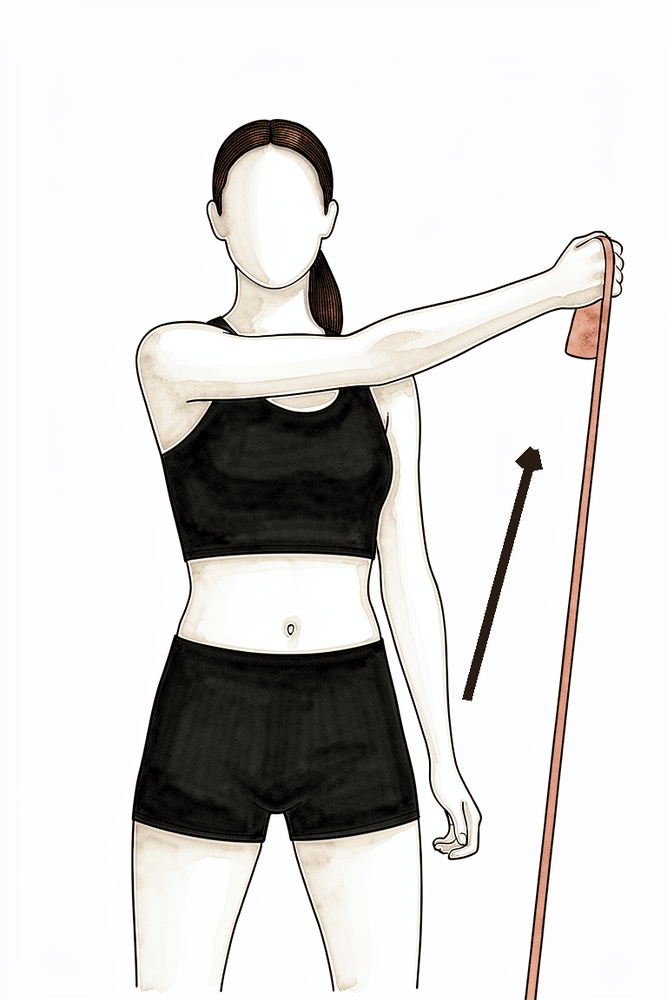
Kieran Hirpara 4.0
Patrón de bandas diagonales (D1)
Sujete una banda elástica y desplácela en diagonal, desde la parte delantera del cuerpo hacia arriba y hacia el lado opuesto, y luego regrese lentamente. Estos movimientos diagonales entrenan el hombro tal como actúa en los gestos cotidianos de alcanzar objetos.
Según las indicaciones de su fisioterapeuta.
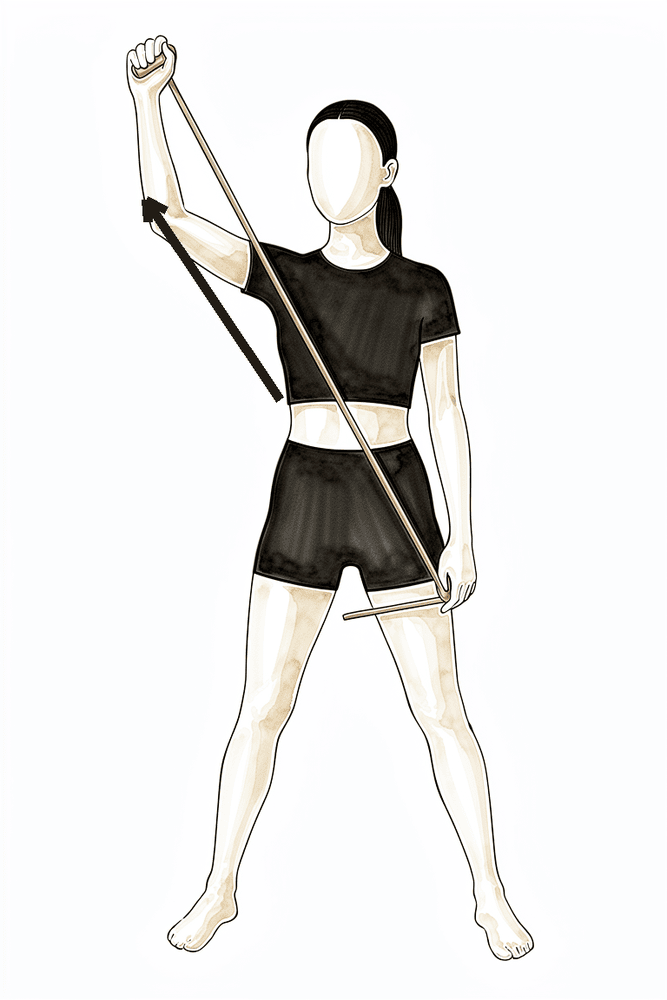
Kieran Hirpara 4.0
Patrón de bandas diagonales (D2)
Sujete una banda elástica en posición baja y cruzándola por delante del cuerpo; luego, levántela por encima de la cabeza y hacia un lado en un movimiento diagonal, terminando con el pulgar hacia arriba, y vuelva lentamente a la posición inicial. Este segundo patrón diagonal ayuda a mejorar el control del movimiento mediante un rango de movilidad más amplio.
Según las indicaciones de su fisioterapeuta.
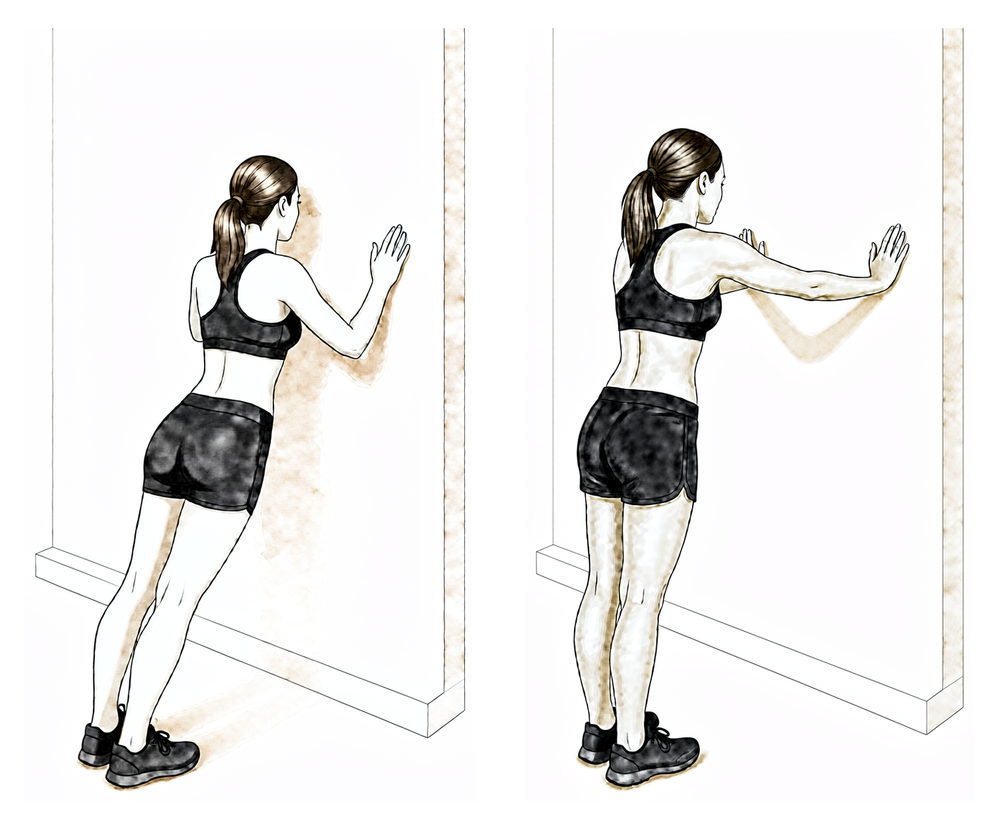
Kieran Hirpara 4.0
Flexión de pared
Párese de frente a una pared, con las manos apoyadas en ella a la altura de los hombros. Flexione los codos para acercar el pecho a la pared y luego empuje hacia atrás; en la posición más elevada, empuje un poco más para que la parte superior de la espalda se curve alejándose de la pared. Comience junto a la pared antes de avanzar; mantenga los omóplatos bajo control.
Según las indicaciones de su fisioterapeuta.
Kieran Hirpara 4.0
Rotación externa en posición 90/90 (con banda)
Con el brazo extendido hacia el lateral a la altura del hombro y el codo doblado en ángulo recto, gire el antebrazo hacia atrás y hacia arriba contra una banda elástica o peso ligero, y luego bájelo lentamente. Este ejercicio fortalece el manguito rotador en la posición elevada (de lanzamiento).
2 a 3 series de 10 a 15 repeticiones, con baja resistencia.
Kieran Hirpara 4.0
Rotación interna en posición 90/90 (con banda)
Desde la misma posición, con el brazo extendido hacia el lateral a la altura del hombro, gire el antebrazo hacia adelante y hacia abajo, en dirección a los pies, oponiéndose a la resistencia de una banda elástica o peso ligero; luego regrese a la posición inicial de forma controlada.
2 a 3 series de 10 a 15 repeticiones, con baja resistencia.
Kieran Hirpara 4.0
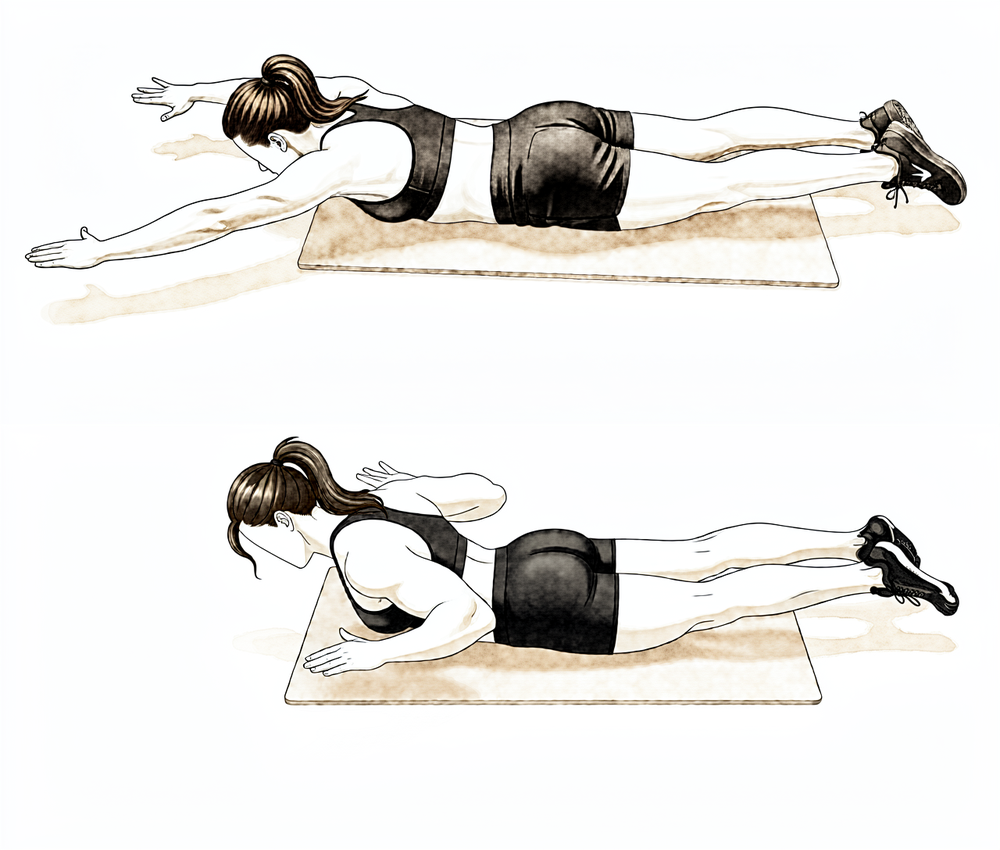
Posición prona Y (parte inferior de la escápula)
Acuéstese boca abajo con el brazo operado extendido por encima de la cabeza y hacia afuera en un ángulo de aproximadamente 45°, formando una “Y”, con el pulgar apuntando hacia arriba. Levante ligeramente el brazo de la superficie, llevando el omóplato hacia abajo y hacia atrás; luego bájelo despacio. Mantenga el movimiento suave: este ejercicio trabaja los músculos inferiores del omóplato.
Según las indicaciones de su fisioterapeuta: ejercicios suaves y con muchas repeticiones.
Kieran Hirpara 4.0
Remo en posición prona
Acuéstese boca abajo con el brazo operado colgando hacia el suelo. Levante el codo hacia el techo, acercando la escápula a la columna vertebral, y luego bájelo lentamente. Comience sin ningún peso y mantenga el movimiento bajo control.
Según las indicaciones de su fisioterapeuta.
Una vez que la reparación ha cicatrizado y el movimiento se ha restablecido en gran medida, se centra la atención en recuperar la fuerza. Los estiramientos que antes estaban prohibidos (estiramientos cruzados del cuerpo y de rotación interna detrás de la espalda) se utilizan ahora para alcanzar los últimos grados de amplitud de movimiento. El entrenamiento de resistencia avanza desde bandas elásticas hasta pesos ligeros; además, se inician flexiones contra la pared antes de progresar. El entrenamiento con pesas en el gimnasio suele reintroducirse a partir de la semana 16, inicialmente con un rango de movimiento limitado y cargas ligeras. En esta fase, se sigue evitando el levantamiento de pesos por encima de la cabeza y los movimientos de empuje o tracción bruscos.
Para su fisioterapeuta:
Objetivos
- Alcanzar una amplitud de movimiento activa y pasiva completa en todos los planos
- Desarrollar progresivamente la fuerza, resistencia y control neuromuscular del manguito rotador y los estabilizadores escapulares
- Preparar al paciente para una vuelta gradual a cargas propias del deporte
Manejo
- Estiramientos multidireccionales hasta el límite de la amplitud: estiramiento cruzado del cuerpo, rotación interna detrás de la espalda, manos detrás de la cabeza, estiramiento “sleepers”, rotación externa a 90 grados de abducción
- Incorporación progresiva de resistencia (aprox. 0.5–2.5 kg) al programa de ejercicios: rotación externa en decúbito lateral, remo en decúbito prono, extensión en decúbito prono, ejercicios en forma de “T” y “Y” en decúbito prono, elevación lateral en posición de pie
- Progresión con bandas elásticas: ejercicios en forma de “T”, “W”, diagonales, rotación interna y externa a 90 grados
- Ejercicios en cadena cerrada: flexiones contra la pared a partir de la semana 12, progresando según la tolerancia del paciente
- Entrenamiento con máquinas a partir de la semana 16: rango de movimiento limitado y cargas ligeras (remo, tracción vertical, ejercicios para bíceps y tríceps; el empuje se reintroduce con cautela)
- Ejercicios de estabilización rítmica, propiocepción y sincronización escapulohumeral
Precauciones
- Evitar el levantamiento de pesos pesados, especialmente por encima de la cabeza, así como empujes o tracciones bruscos
- El fortalecimiento debe realizarse sin dolor y sin exceder los límites de amplitud que provoquen molestias
- Mantener el control escapular en todo el rango de movimiento; reducir la carga si se observan movimientos anómalos o compensaciones
Criterios para avanzar
- Movilidad activa y pasiva del hombro dentro de límites funcionales en todas las direcciones
- Tolerancia al programa de fortalecimiento progresivo sin aparición de síntomas dolorosos
Fase IV — Retorno al deporte y al trabajo pesado (a partir de la semana 18)
La fase final consiste en un retorno gradual a trabajos exigentes, cargas por encima de la cabeza y actividades deportivas. Se incorporan ejercicios pliométricos y específicos de cada deporte al programa de fortalecimiento; además, los programas por intervalos guían el retorno al lanzamiento, la natación, el golf y los deportes de raqueta. El retorno a deportes de contacto y colisión suele tardar entre cuatro y seis meses desde la cirugía, dependiendo de la recuperación total de la movilidad, la fuerza y la confianza en el brazo; los programas publicados para atletas de contacto a veces duran más, hasta unos nueve meses. Los atletas de fuerza suelen volver a su entrenamiento habitual en un plazo similar. Su fisioterapeuta y cirujano le guiarán en la autorización final; algunos atletas de contacto optan por usar un protector de hombro durante la primera temporada tras la cirugía.
Para su fisioterapeuta:
Objetivos
- Mantener una amplitud de movimiento completa
- Aumentar progresivamente la fuerza, la potencia y la resistencia según las exigencias del trabajo y el deporte del paciente
- Retorno gradual y basado en criterios a deportes de contacto y con cargas por encima de la cabeza
Manejo
- Continuar y avanzar el programa de fortalecimiento de la Fase III
- Progresiones en ejercicios de cadena cerrada: progresión de flexiones en superficies inestables, ejercicios con pelota contra la pared
- Ejercicios pliométricos para atletas de lanzamiento y con cargas por encima de la cabeza: lanzamientos contra un reboteador, ejercicios con pelota pesada, dribleo contra la pared, ejercicios de desaceleración
- Programas deportivos por intervalos para lanzamiento, golf, tenis y natación
- Fortalecimiento y resistencia de la cadena cinética específicos para la función y la ocupación del paciente
Precauciones
- El retorno a deportes de contacto y colisión solo debe realizarse cuando se haya recuperado plenamente la amplitud de movimiento, la fuerza y tras obtener autorización quirúrgica
- La progresión debe guiarse por la ausencia de síntomas: si aparece dolor o sensación de inestabilidad, se debe retroceder un paso en el programa
Después de seguir el protocolo
Las fases descritas anteriormente se basan en protocolos de rehabilitación publicados para la estabilización y reconstrucción de la articulación acromioclavicular: el programa de rehabilitación de Massachusetts General Brigham Sports Medicine, el programa de reconstrucción de la articulación acromioclavicular del Massachusetts General Hospital, las guías de estabilización de las unidades ortopédicas del Reino Unido, así como una revisión sistemática de protocolos de reconstrucción de dicha articulación disponibles públicamente. Los plazos indicados en semanas son orientativos y no fijos; los programas publicados varían. Su rehabilitación continua será guiada individualmente por su fisioterapeuta, en colaboración con nuestra clínica, según la evolución de su reparación quirúrgica y su capacidad de movimiento. Esta página complementa las indicaciones generales de recuperación que ofrece nuestra clínica; consulte control del dolor postoperatorio y cuidado de la herida. Para información sobre la intervención quirúrgica y la lesión tratada, véase Estabilización de la articulación acromioclavicular. La evidencia científica que sustenta este protocolo (reconstrucción, estudios sobre pérdida de reducción y estudios de rehabilitación) se resume en la sección de evidencia, disponible en formato PDF en la parte superior de esta página.
Evidence & references
This is the clinical evidence summary written for health professionals. It is technical, and it lists the research this page was built from. You do not need to read it to understand your treatment or to make a decision about it.
Acromioclavicular Joint Stabilisation / Reconstruction — Operative Rationale & Post-operative Rehabilitation (Evidence)
Topic scope: Post-operative rehabilitation after acromioclavicular (AC) joint stabilisation / reconstruction for a high-grade AC joint dislocation (Rockwood type III–V) — restoring the alignment between the clavicle and scapula with a coracoclavicular (CC) suspensory device (suture-button / endobutton construct), with or without a biological tendon graft (semitendinosus / pectoralis minor) and with or without a direct AC ligament reconstruction. This page also summarises the operative/non-operative evidence that frames the rehabilitation choices. It is the clinician-facing companion to the patient protocol.
Defining principle of the surgical rehab here — PROTECT the construct. Unlike a capsular release (where the enemy is re-stiffening and rehab is immediate aggressive ROM), AC joint stabilisation is a protect-the-repair pathway, closer in spirit to a rotator-cuff or instability repair. The reconstruction has to resist the constant downward pull of gravity on the weight of the arm — the exact deforming force that displaced the joint in the first place. A suspensory suture-button or tendon graft has no early intrinsic strength; biological healing of the CC/AC ligaments and tunnel incorporation takes weeks to months, and the dominant early complication is loss of reduction before that healing matures. So the rehab is deliberately conservative: the sling carries the weight of the arm (typically ~6 weeks), active elevation and any downward traction on the arm are avoided early, ROM is restricted (no elevation > 90°, no cross-body, no reaching behind the back) for the first 6 weeks, strengthening waits until the construct has matured (~12 weeks), and return to contact/collision sport is deferred to ~4–6 months. Motion progression and protection are the two levers; the single most important point distinguishing this protocol from the capsular-release inversion is that here, time and protection are the friends, not the enemy.
A. THE OPERATION & WHY REHAB IS PROTECTIVE
A high-grade AC dislocation tears the AC and coracoclavicular (conoid + trapezoid) ligaments, allowing the clavicle to rise relative to the acromion under the weight of the arm. Surgical stabilisation aims to restore the CC distance and let the ligaments heal in a reduced position. Contemporary constructs are predominantly:
- CC suspensory fixation — a suture-button / endobutton loop passed through clavicular and coracoid tunnels (e.g. flip-button, single- or double-tunnel). Restores vertical stability.
- + Biological augmentation — a free tendon graft (semitendinosus allograft/autograft, or the pectoralis minor / coracoacromial ligament in Weaver–Dunn-type procedures) to reconstruct the CC ± AC ligaments. The anatomy of the pectoralis minor tendon has been characterised specifically for this use [pec minor anatomy, JSES 2007].
- + Direct AC reconstruction — adding an AC-level construct to the CC reconstruction improves horizontal stability; combined CC + AC reconstruction gives better radiographic reduction and lower reoperation rates than isolated CC reconstruction in pooled data.
The structural properties of the reconstructed CC complex have been measured biomechanically: reconstructions restore much, but not all, of the intact ligament's stiffness and load to failure [Structural Properties, Am J Sports Med 2000]. This is the mechanical basis for protecting the construct early — the graft/button is weaker than the native ligament until it heals and incorporates.
B. EVIDENCE BY THEME
1. Operative vs non-operative — only high grades benefit from surgery
- Type I–II AC injuries are managed non-operatively. Type III is genuinely controversial and most are treated non-operatively first; type IV–V are the usual operative indications [ACJ Injuries: Evidence-based Treatment, JAAOS 2018]. A network meta-analysis of RCTs for acute Rockwood III–V found no single surgical technique clearly superior, and that surgery's advantage over non-operative care is modest and grade-dependent [network MA, JSES 2023].
- Hook-plate fixation of acute dislocations improved radiographic but NOT clinical outcomes versus non-operative treatment [Hook-plate RCT, JBJS 2017] — a caution that radiographic reduction does not automatically translate into a better patient outcome, and a reason the hook plate (which requires removal) is not the preferred construct here.
- The Rockwood classification itself has only moderate reliability between observers [Rockwood reliability, JSES 2021], which is part of why type III decision-making is debated.
2. Loss of reduction is the dominant complication — and it shapes the rehab
- Loss of reduction (the clavicle drifting back up) is the most frequent radiographic failure after suspensory-device stabilisation. Clavicular tunnel widening correlates with post-operative loss of reduction in an implant-dependent way [tunnel widening, Arthroscopy 2023] — i.e. the construct and tunnel position matter.
- Radiographic failure and reoperation rates after ACJ reconstruction are non-trivial [radiographic failure / reoperation, Bone Joint J 2016]; one suspensory-device series reported ~10–11% revision for loss of reduction / implant failure (suture fatigue, button escape, coracoid stress fracture, deep infection) [web: suspensory-device cohort].
- Adding the AC-level reconstruction and a biological graft improves radiographic reduction and lowers reoperation versus isolated CC suture-button [web: combined CC+AC reviews].
- Complications after operative treatment of high-grade injuries are well catalogued [complications, JSES 2023] — they include loss of reduction, coracoid/clavicle fracture, hardware problems and infection.
Rehab implication: because the early failure mode is mechanical loss of reduction under arm-weight loading, the early phase forbids active elevation, lifting, downward traction on the arm and weight-bearing through the arm — the patient protects the construct while the ligaments and tunnels heal.
3. Outcomes and return to sport are generally good — but timeline is conservative
- Anatomic CC reconstruction with semitendinosus graft for chronic dislocation gives good clinical and radiological results [semitendinosus reconstruction, KSSTA 2020].
- Sports activity after anatomic flip-button stabilisation is generally restored, with most athletes returning to their pre-injury sport, though return is gradual [flip-button sport, KSSTA 2016].
- Delayed (chronic) reconstruction with a modern suspensory device does not increase fixation failure or major complications versus acute fixation [web: delayed reconstruction].
4. The rehab protocol itself is consensus/expert, not RCT-derived — and it is highly variable
A systematic review of publicly available ACJ-reconstruction rehabilitation protocols found they are widely variable: sling duration ranged 3–8 weeks (the modal recommendation was 6 weeks, in 8/18 protocols), active ROM commonly began at ~6 weeks (6/20 protocols), and heavy/strenuous shoulder use was typically prohibited for a further ~6 weeks beyond the initial 6-week protection period [Cheema et al., Arthrosc Sports Med Rehabil 2021]. There is no high-level RCT defining the optimal post-op regimen — phase timings are expert/consensus.
The patient protocol's phase boundaries (0–6 / 6–12 / 12–18 weeks, sling 6 weeks, return to contact sport ~4–6 months) sit squarely within this published range and match the Massachusetts General Brigham / MGH Sports Medicine ACJ-reconstruction guideline (Phase I 0–6 wk, Phase II 7–12 wk, Phase III 13–18 wk) and similar surgeon protocols (e.g. Dickens: 6-week sling, return to all activity months 4–6).
C. PHASED POST-OP TIMELINE (consistent with the patient protocol)
| Phase | Window | Sling | ROM | Strengthening | Notes |
|---|---|---|---|---|---|
| I — Protecting the repair | Weeks 0–6 | Yes, ~6 wk whenever up; worn for sleep weeks 0–3 (arm-weight loads the repair even lying down) | Pendulum + passive/assisted elevation to 90° max in scapular plane; assisted ER to ~30°; NO active elevation, no cross-body, no behind-the-back | Hand/wrist/elbow AROM; scapular setting; sub-maximal pain-free isometric IR/ER only | No driving while in the sling (~6 wk). No lifting > ~0.5 kg, no carrying, no leaning/pushing up on the arm, no letting the arm hang unsupported — each loads the construct |
| II — Restoring movement | Weeks 6–12 | Wean off | Progress assisted → active ROM; build toward full by ~12 wk (~15°/week as a guide); behind-the-back introduced gradually (to beltline) | Light elastic-band cuff + scapular work begins (rows, IR/ER, serratus punch); side-lying ER, prone row/T/Y | Lift to ~1 kg; avoid forceful push/pull, push-ups, overhead and cross-body lifting |
| III — Strengthening | Weeks 12–18 | Off | Full ROM goal; end-range stretches (cross-body, behind-back, sleeper) now used to win final range | Progressive resistance ~0.5–2.5 kg; wall push-ups from ~wk 12; machine weights from ~wk 16 (limited range, light load) | Construct matured; still avoid heavy overhead and forceful push/pull |
| IV — Return to sport / heavy work | Week 18 onward | Off | Maintain full ROM | Plyometrics, sport-specific & interval programs; occupation-specific kinetic-chain loading | Return to contact/collision sport ~4–6 months (collision athletes / some occupations longer, up to ~9 mo); criteria-based clearance; some wear a brace first season back |
(Phase boundaries from the MGH/Mass General Brigham ACJ-reconstruction guideline; return-to-sport windows from the flip-button sport series and surgeon protocols; all within the variability documented by Cheema et al. 2021.)
D. KEY CONTROVERSIES / EVIDENCE QUALITY
- Type III — operate or not? The most-debated grade; most are trialled non-operatively first. No clear winner in RCT-level data, compounded by only-moderate reliability of the Rockwood grade itself. Moderate / conflicting.
- Which construct? Network MA shows no single technique clearly superior for acute III–V. Combined CC + AC reconstruction (± graft) gives better radiographic reduction and lower reoperation than isolated CC suture-button, but at the cost of complexity. Hook plates improve radiographs but not clinical scores and need removal. Moderate.
- Loss of reduction vs clinical outcome. Radiographic loss of reduction is common yet often clinically well-tolerated — radiographic and patient-reported outcomes diverge. This tempers how aggressively reduction should be chased. Moderate.
- The rehab protocol is consensus, not trial-derived, and published protocols vary widely (sling 3–8 wk; Cheema 2021). The patient page's timings are typical, not RCT-validated. Weak / consensus.
E. EVIDENCE-STRENGTH FLAGS (summary)
- STRONG (RCT / SR-MA): hook-plate improves radiographic but not clinical outcomes vs non-operative (RCT, JBJS 2017); network meta-analysis of RCTs for acute III–V shows no clearly superior technique (JSES 2023).
- MODERATE (cohorts / biomechanical / SR): anatomic semitendinosus CC reconstruction outcomes (KSSTA 2020); sports return after flip-button stabilisation (KSSTA 2016); loss-of-reduction / tunnel-widening drivers (Arthroscopy 2023; Bone Joint J 2016); complications of high-grade operative treatment (JSES 2023); reconstructed-CC biomechanics (AJSM 2000); combined CC+AC > isolated CC for reduction/reoperation; delayed reconstruction safety.
- WEAK / CONSENSUS ONLY: the post-operative rehabilitation protocol itself — no defining RCT; protocols are expert/consensus and highly variable (Cheema 2021; sling 3–8 wk). Rockwood classification reliability only moderate (JSES 2021).
CITATIONS
RAG corpus (180,000+ Orthopaedic articles)
- Anatomy of the pectoralis minor tendon and its use in acromioclavicular joint reconstruction. J Shoulder Elbow Surg. 2007. DOI: 10.1016/j.jse.2006.09.007
- Clavicular tunnel widening after acromioclavicular stabilization shows implant-dependent correlation with postoperative loss of reduction. Arthroscopy. 2023. DOI: 10.1016/j.arthro.2023.05.014
- Acromioclavicular joint injuries: evidence-based treatment. J Am Acad Orthop Surg. 2018. DOI: 10.5435/jaaos-d-17-00105
- Review of Weaver and Dunn on treatment of acromioclavicular injuries, especially complete acromioclavicular separation. J ISAKOS. 2019. DOI: 10.1136/jisakos-2019-000299
- Structural properties of the intact and the reconstructed coracoclavicular ligament complex. Am J Sports Med. 2000. DOI: 10.1177/03635465000280010201
- Complications after operative treatment of high-grade acromioclavicular injuries. J Shoulder Elbow Surg. 2023. DOI: 10.1016/j.jse.2023.03.019
- Sports activity after anatomic acromioclavicular joint stabilisation with flip-button technique. Knee Surg Sports Traumatol Arthrosc. 2016. DOI: 10.1007/s00167-016-4287-7
- Anatomic reconstruction of the coracoclavicular and acromioclavicular ligaments with semitendinosus tendon graft for the treatment of chronic acromioclavicular joint dislocation provides good clinical and radiological results. Knee Surg Sports Traumatol Arthrosc. 2020. DOI: 10.1007/s00167-020-06285-x
- Hook-plate fixation in patients with acute acromioclavicular joint dislocation improved radiographic but not clinical outcomes compared with nonoperative treatment. J Bone Joint Surg Am. 2017. DOI: 10.2106/jbjs.16.00582
- Radiographic failure and rates of re-operation after acromioclavicular joint reconstruction. Bone Joint J. 2016. DOI: 10.1302/0301-620x.98b4.35935
- Treatment options for acute Rockwood type III–V acromioclavicular dislocations: a network meta-analysis of randomized controlled trials. J Shoulder Elbow Surg. 2023. DOI: 10.1016/j.jse.2023.01.039
- A relook at the reliability of Rockwood classification for acromioclavicular joint injuries. J Shoulder Elbow Surg. 2021. DOI: 10.1016/j.jse.2021.01.016
Literature (URLs)
- Cheema SG, Hermanns C, Coda RG, et al. Publicly accessible rehabilitation protocols for acromioclavicular joint reconstruction are widely variable. Arthrosc Sports Med Rehabil. 2021;3(2):e427–e433. https://doi.org/10.1016/j.asmr.2020.10.007 (sling 3–8 wk, modal 6 wk; active ROM ~6 wk; further ~6 wk before heavy use)
- Acromioclavicular joint injuries: effective rehabilitation (review). PMC. https://pmc.ncbi.nlm.nih.gov/articles/PMC8169819/
- Delayed acromioclavicular joint reconstruction using a modern tunnelled suspensory device does not increase the risk of fixation failure or major complications. PubMed. https://pubmed.ncbi.nlm.nih.gov/35781084/
- Low rate of substantial loss of reduction immediately after hardware removal following ACJ stabilization using a suspensory fixation system. KSSTA. https://link.springer.com/article/10.1007/s00167-022-06978-5
- Minimum 10-year outcomes after arthroscopically assisted anatomic coracoclavicular ligament reconstruction for type III and V AC joint injuries. ScienceDirect. https://www.sciencedirect.com/science/article/pii/S2666638325001835
Published rehab protocols (URLs — basis for the phase structure)
- Massachusetts General Brigham Sports Medicine. Rehabilitation guideline for acromioclavicular joint reconstruction (including coracoclavicular ligament reconstruction). https://www.massgeneral.org/assets/MGH/pdf/orthopaedics/sports-medicine/physical-therapy/rehabilitation-protocol-for-acromioclavicular-joint-reconstruction.pdf (Phase I 0–6 wk sling, Phase II 7–12 wk, Phase III 13–18 wk)
- Dickens JD. AC joint reconstruction protocol (Duke Sports Medicine). https://www.jondickensmd.com/pdf/ac-joint-reconstruction-protocol.pdf (6-week sling worn for sleep; return to all activity months 4–6)
- Chambler A. ACJ stabilisation rehabilitation guidelines. https://www.andrewchambler.com/post/acj-stabilisation-rehabilitation-guidelines
- North Tees and Hartlepool NHS Foundation Trust. Acromioclavicular joint stabilisation — LockDown/Weaver Dunn procedure. https://www.nth.nhs.uk/resources/acromioclavicular-joint-stabilisation-lockdown-weaver-dunn-procedure/
- Stone Clinic. Acromioclavicular (AC) joint reconstruction rehab protocol. https://www.stoneclinic.com/Acromioclavicular-AC-joint-reconstruction-rehab-protocol